想写几篇短的,奈何短篇文章确实不利于之后的翻阅, 以及工作上效率的提升.考虑到这点, 于是乎将所有的Java进阶的内容全部放到一篇文章中了, 其实前面也有零零散散的写过一些进阶的和基础的文章.
一些话想对自己以及朋友们分享:
苏格拉底曾说过:“未经审视的人生,是不值得过的”。
他老人家是想表达:生活,不是通过世俗的物质方式去度过,而是要透过理性,审视人的生命的终极需求,从而引导出一种新的生活态度。
哲学角度有点高,也不是所有人每天都会去思考生命的终极需求。但不可否认的是,我们的人生,的确需要审视!
好啦,开始本篇进阶教程;首先进阶的最重要的就是面向对象以及面向接口编程思想.
面向对象
面向对象的三大主要特性就是封装, 继承, 多态.
在面向对象之前,还有几个关键字.
Static关键字
Static可以修饰成员变量,成员方法, 代码块
- Static修饰成员变量的时候:该变量作为类变量, 被所有的对象所共享.应用场景为计数器
- Static修饰成员方法的时候: 该方法作为静态方法, 可以通过类名.方法名 的形式直接调用, 避免了创建对象造成的内存浪费
- Static修饰代码块的时候: 该代码块作为静态代码块会随着类的加载而加载, 一般用于给类变量赋值.
- 与静态代码块向对应的是实例代码块, 作用和构造器是一样的, 都是用来给实例对象初始化.
参考链接
继承
继承就是将相同的内容合并到一个父类中, 简化了代码提高了代码的复用性
封装就是将成员变量私有化, 提高了代码的安全性
参考链接:
【Java进阶】继承及应用场景 | 书下酒云赠人 (liamjohnson-w.github.io)
【Java进阶】继承之方法的重写 | 书下酒云赠人 (liamjohnson-w.github.io)
接口和多态
内部类
To be continue…..
枚举
To be continue…..
泛型
To be continue…..
常用API
StringBuilder
概述
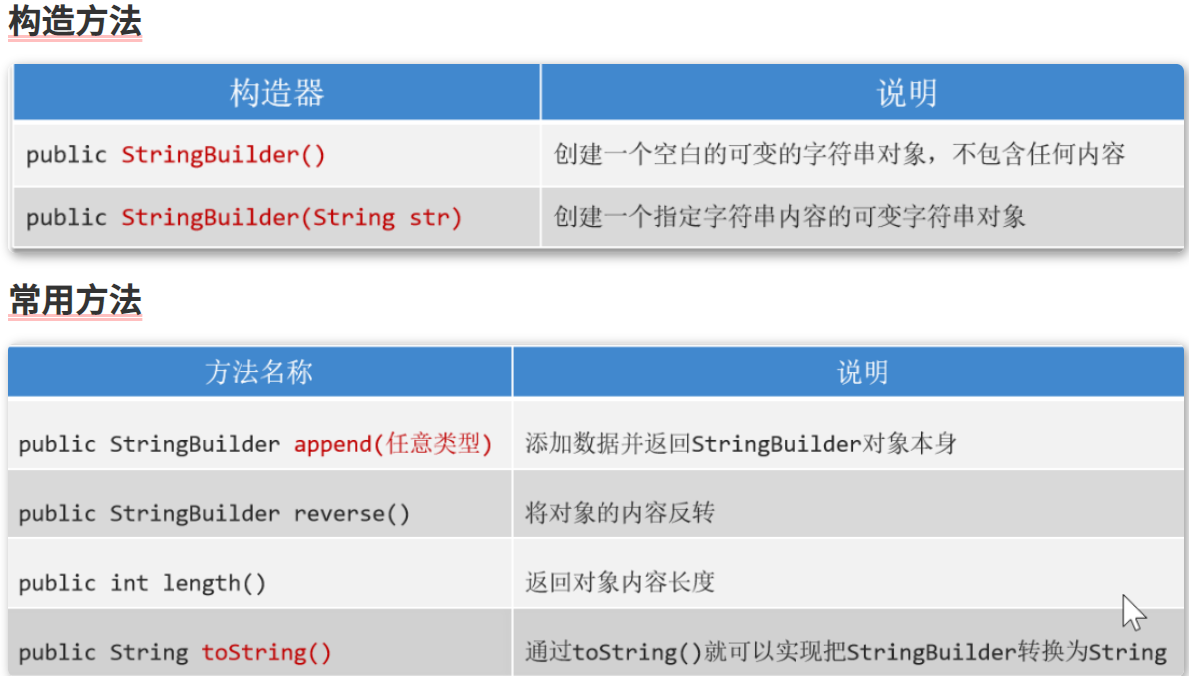
是java编写的一个专门用于字符串拼接的类,可以当成一个字符串拼接的容器使用,提供了对容器中的数据进行增删改的功能,并提升了字符串的拼接效率;
作用
- 提供了字符串拼接,反转,修改内容的方法,弥补了字符串对象
不能修改内容的缺点;
提升了字符串拼接的效率;
使用方式
- 由于类中的方法都是非静态的,而且字符串工具,你没有个对象调什么方法,所以还是老老实实造对象吧。
- 利用构造方法创建对象;
- 面向创建好的对象直接调用类中的方法即可;
常用方法
方法介绍
- 空参,全参构造
- append(任意类型):将任意的数据类型追加到StringBuilder对象的末尾并返回对象本身
- reverse():反转sb对象
- 对象名.length():返回对象的长度
- 对象名.toString():将StringBuilder对象转为String基本数据类型
代码案例
1
2
3
4
5
6
7
8
9
10
11
12
13
14
15
16
17
18
19
|
public class StringBuilderCourse {
public static void main(String[] args) {
StringBuilder sb = new StringBuilder();
sb.append(123);
sb.append(true);
sb.append("heihei");
sb.append(5.6);
sb.append('好');
System.out.println(sb);
sb.reverse();
System.out.println(sb);
}
}
|
StringBuilder应用场景
StringBuilder的两个常见的应用场景为:
Example1
说实话:Python中一行代码顶Java100行,下面代码等于一句','.join(list)
1
2
3
4
5
6
7
8
9
10
11
12
13
14
15
16
17
18
19
20
21
22
23
24
25
26
27
28
29
30
31
32
33
34
35
36
37
38
39
|
public class StringBuilderExample1 {
public static void main(String[] args) {
int[] arr = {4, 7, 8, 9, 5, 3};
String res = toString(arr);
System.out.println(res);
}
public static String toString(int[] arr){
if (arr == null){
return null;
}
if (arr.length == 0){
return "[]";
}
StringBuilder sb = new StringBuilder("[");
for (int i = 0; i < arr.length; i++) {
sb.append(arr[i]);
if (i != arr.length -1){
sb.append(',');
}else {
sb.append(']');
}
}
return sb.toString();
}
}
|
Example2
1
2
3
4
5
6
7
8
9
10
11
12
13
14
15
16
17
18
19
20
21
22
23
24
25
|
public class JudgeSymmetry {
public static void main(String[] args) {
String s = "accd";
System.out.println(symmetry(s));
}
public static boolean symmetry(String s){
StringBuilder sb = new StringBuilder(s);
StringBuilder newSb = sb.reverse();
String newStr = newSb.toString();
if (newStr.equals(s)){
return true;
}else {
return false;
}
}
}
|
StringJoiner
概述
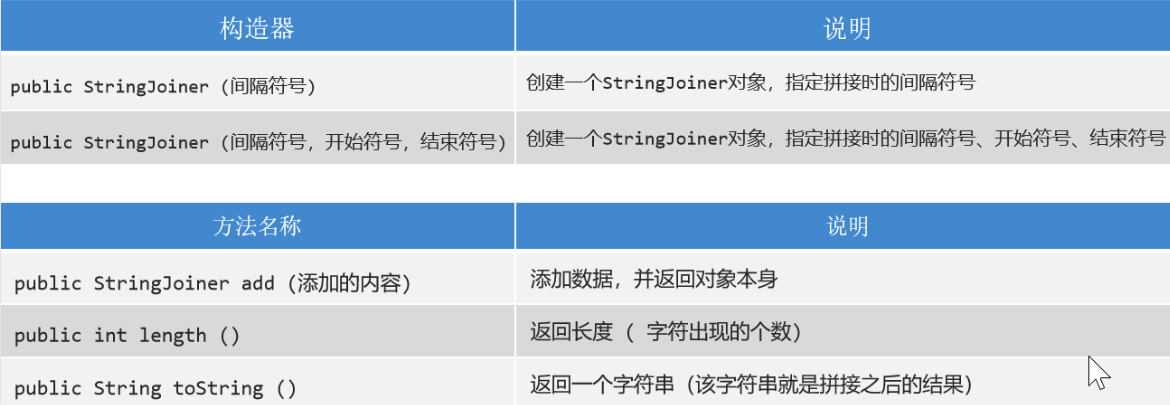
是java8提供的一个专门针对有规律的字符串拼接的一个类;
作用
- 能保证字符串的拼接效率;
- 能保证拼接字符串的简洁度;
使用场景
- 只能针对字符串或字符串缓冲区拼接;
- 必须保证要拼接的结果是有规律的!
常用方法
跟StringBuilder类的方法区别就在于StringBuilder 添加元素是append,而StringJoiner是add
- 空参,全参构造方法
- add(基本数据类型的数据):添加数据,类似于StringBuilder中的append
- length:这个不多说了
- toString:这个是个Stringxxx的方法都支持的吧
代码案例
1
2
3
4
5
6
7
8
9
10
11
12
13
14
15
16
17
18
19
20
21
22
23
24
25
26
|
public class JudgeSymmetry {
public static void main(String[] args) {
String s = "accd";
System.out.println(symmetry(s));
}
public static boolean symmetry(String s){
StringBuilder sb = new StringBuilder(s);
StringBuilder newSb = sb.reverse();
String newStr = newSb.toString();
if (newStr.equals(s)){
return true;
}else {
return false;
}
}
}
|
Math
概述
java提供的专门进行数学运算的工具类;所有方法都是静态方法,通过类名直接调用即可;
常用方法

代码案例
1
2
3
4
5
6
7
8
9
10
11
12
13
14
15
16
17
18
19
20
21
22
23
| public class MyMath {
public static void main(String[] args) {
System.out.println(Math.abs(-5));
System.out.println(Math.ceil(3.01));
System.out.println(Math.floor(5.9));
System.out.println(Math.round(5.5));
System.out.println(Math.max(5.0,-4));
System.out.println(Math.pow(2, 3));
System.out.println(Math.random());
}
}
|
System
概述
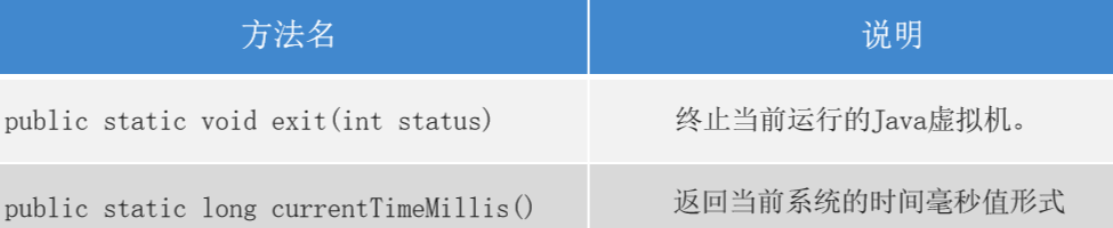
专门用于描述系统相关操作的工具类,里面所有的方法都是静态的!
常用方法
 da
da
代码案例
1
2
3
4
5
6
7
8
9
10
11
12
|
public class MySystem {
public static void main(String[] args) {
System.out.println("嘿嘿");
System.out.println("看看能执行吗");
System.out.println(System.currentTimeMillis());
}
}
|
Runtime
概述
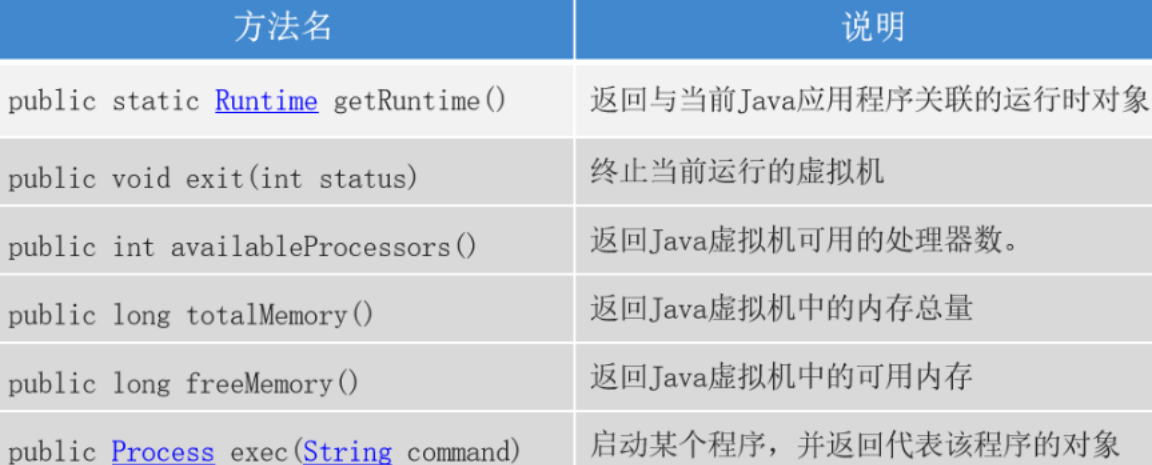
与当前程序应用环境相关的工具类,获取对象的时候,利用 静态的getRuntime()方法,获取对象后,利用对象调用成员方法;
常用方法
代码案例
1
2
3
4
5
6
7
8
9
10
11
12
13
14
15
16
17
18
19
20
21
22
23
24
25
26
27
| import java.io.IOException;
import java.util.Scanner;
public class MyRuntime {
public static void main(String[] args) throws IOException {
Runtime r = Runtime.getRuntime();
System.out.println(r.availableProcessors());
System.out.println(r.totalMemory() / 1024 / 1024 + "MB");
System.out.println(r.freeMemory() / 1024 / 1024 + "MB");
Process process = r.exec("notepad");
Scanner sc = new Scanner(System.in);
System.out.println("请输入任意内容,让程序继续执行!");
sc.next();
process.destroy();
}
}
|
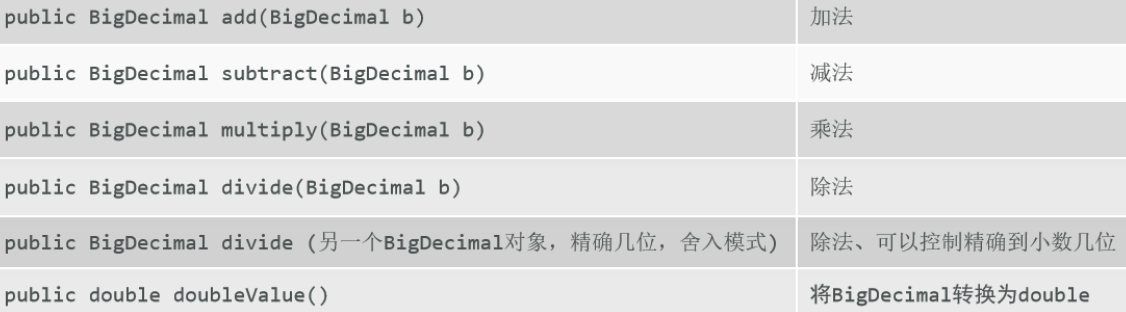
BigDecimal
概述
java编写的专门用于精确运算的类;
作用
对小数可以完成精确运算;
使用方式
- 创建对象
- 调用方法
获取对象的方式
- 方式一:利用构造方法;
public BigDecimal(String val) -- 把String变成BigDecimal
- 方式二:利用静态方法;
public static BigDecimal valueOf(double val) -- 把double类型的变量变成BigDecimal
常用成员方法(必须要有对象
代码案例
1
2
3
4
5
6
7
8
9
10
11
12
13
14
15
16
17
18
19
20
21
22
23
24
25
| import java.math.BigDecimal;
public class MyBigDecimal {
public static void main(String[] args) {
System.out.println(0.2 + 0.1);
BigDecimal bd1 = new BigDecimal("0.1");
BigDecimal bd2 = BigDecimal.valueOf(0.2);
BigDecimal add = bd1.add(bd2);
double v = add.doubleValue();
System.out.println(v);
System.out.println(bd1.subtract(bd2).doubleValue());
System.out.println(bd1.multiply(bd2).doubleValue());
System.out.println(bd1.divide(bd2).doubleValue());
}
}
|
Notice: divide方法除不尽情况
可以在divide方法中传递3个参数,第1个参数是除数,第2个参数是保留的小数位数,第3个参数是java写好的枚举类中罗列的舍入模式;
比较常见的舍入模式有3个:UP, DOWN, HALF_UP
Tips: RoundingMode(枚举类名)
CodeDemo
1
2
3
4
5
6
7
8
9
10
11
12
13
14
| public class MyBigDecimal_pro {
public static void main(String[] args) {
BigDecimal bd1 = new BigDecimal("0.2");
BigDecimal bd2 = BigDecimal.valueOf(0.3);
BigDecimal divide = bd1.divide(bd2, 3, RoundingMode.HALF_UP);
System.out.println(divide.doubleValue());
}
}
|
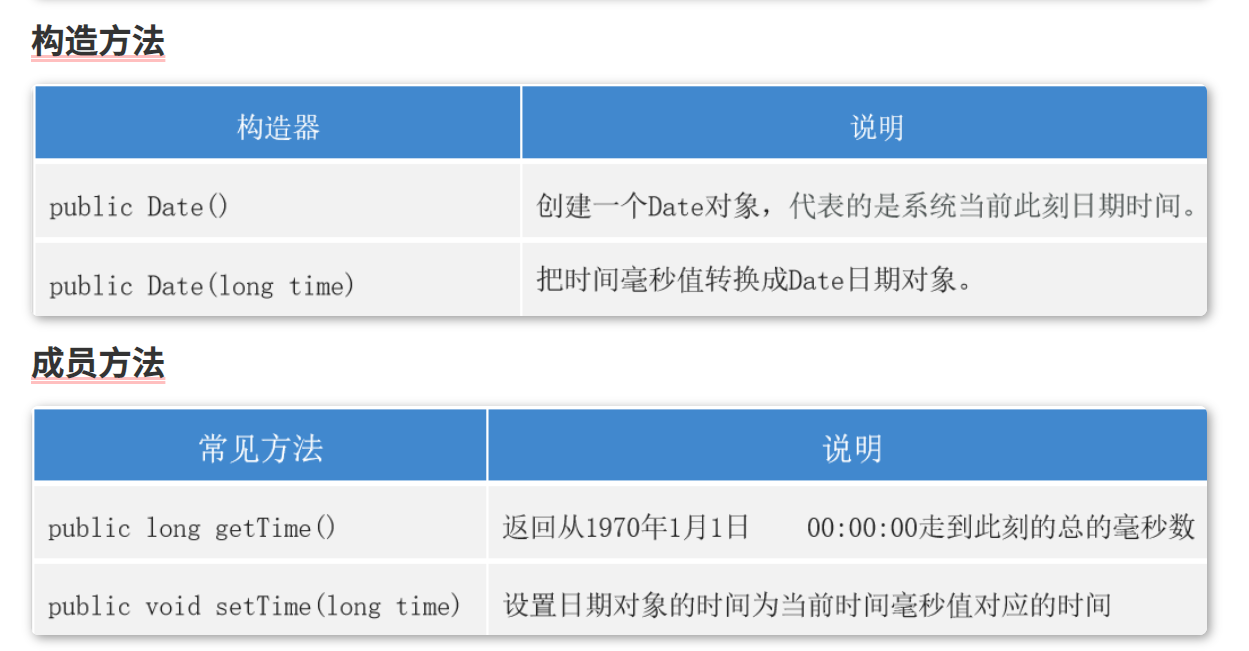
JDk7日期
Date概述
是java7以前提供的用于表示时间点的类,以1970年1月1日0点0分0秒为时间原点;
里面很多方法都被废弃了。
常用方法
代码案例
1
2
3
4
5
6
7
8
9
10
11
12
13
14
15
16
17
18
19
20
| import java.util.Date;
public class MyDate {
public static void main(String[] args) {
Date d = new Date();
System.out.println(d);
System.out.println(d.toLocaleString());
Date d1 = new Date(-1000 * 60 * 60 * 24 * 7);
System.out.println(d1.toLocaleString());
System.out.println(d1.getTime());
System.out.println(d.getTime());
System.out.println(System.currentTimeMillis());
}
}
|
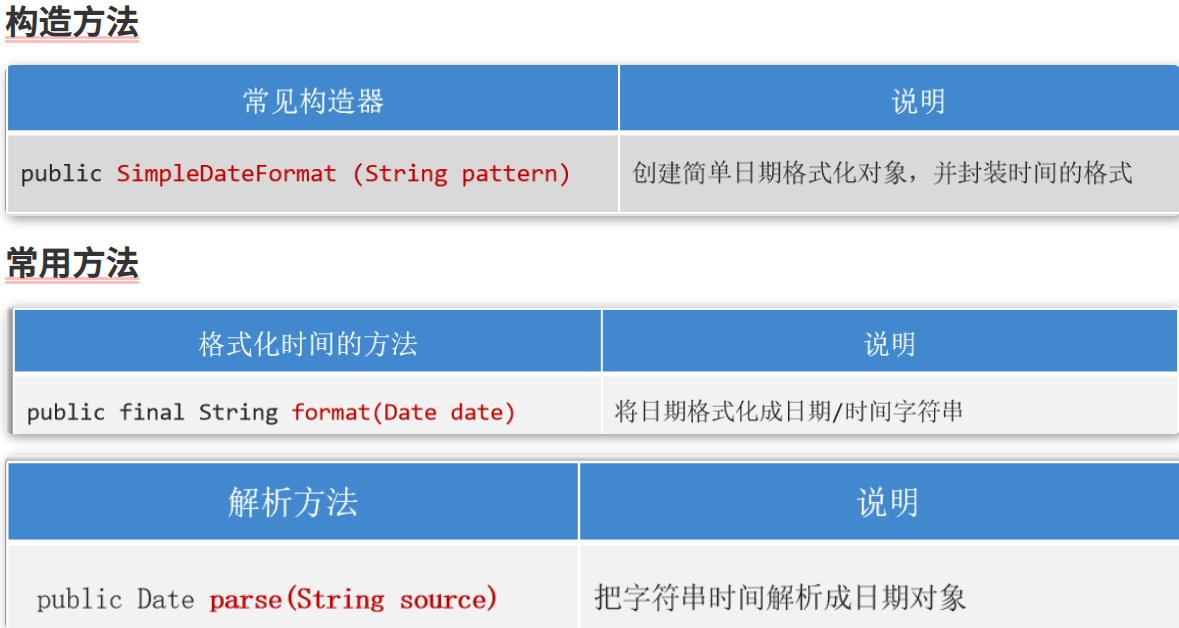
JDK7的日期格式化工具类
是java专门针对Date类提供的工具类;可以将Date和字符串之间进行相互转换!
如何使用
- 创建工具对象;(一般会指定字符串的格式,既模式字符串)
- 使用工具对象,调用方法,即可完成字符串和Date的相互转换;
常用方法
格式化
1
| 将Date转成字符串,这个过程叫做格式化;对应的方法名: format(日期对象);
|
解析
1
| 将字符串转成Date,这个过程叫做解析;对应的方法名: parse(字符串);
|
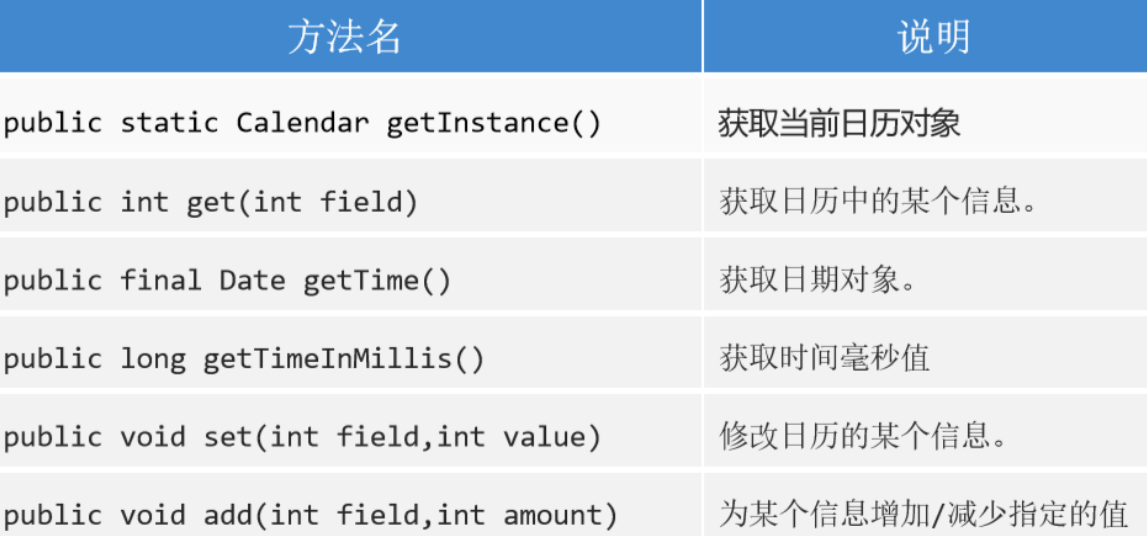
Calendar
概述
是java7提供的一个用于表示日历的类,可以对时间进行推移运算;
使用方式
- 利用静态方法获取对象;
- 面向对象,调用方法;
常用方法
代码案例
1
2
3
4
5
6
7
8
9
10
11
12
13
14
15
16
17
18
| import java.util.Calendar;
public class MyCalendar {
public static void main(String[] args) {
Calendar ins = Calendar.getInstance();
int y = ins.get(Calendar.YEAR);
int m = ins.get(Calendar.MONTH);
int d = ins.get(Calendar.DATE);
System.out.println("年份为:" + y + "; 月份为:" + m + "; 日期为:" + d);
ins.add(Calendar.MONTH, -1);
System.out.println(ins.get(Calendar.MONTH));
}
}
|
日期类
JDk7日期
Date概述
是java7以前提供的用于表示时间点的类,以1970年1月1日0点0分0秒为时间原点;
里面很多方法都被废弃了。
常用方法
代码案例
1
2
3
4
5
6
7
8
9
10
11
12
13
14
15
16
17
18
19
20
| import java.util.Date;
public class MyDate {
public static void main(String[] args) {
Date d = new Date();
System.out.println(d);
System.out.println(d.toLocaleString());
Date d1 = new Date(-1000 * 60 * 60 * 24 * 7);
System.out.println(d1.toLocaleString());
System.out.println(d1.getTime());
System.out.println(d.getTime());
System.out.println(System.currentTimeMillis());
}
}
|
JDK7的日期格式化工具类
是java专门针对Date类提供的工具类;可以将Date和字符串之间进行相互转换!
如何使用
- 创建工具对象;(一般会指定字符串的格式,既模式字符串)
- 使用工具对象,调用方法,即可完成字符串和Date的相互转换;
常用方法
格式化
1
| 将Date转成字符串,这个过程叫做格式化;对应的方法名: format(日期对象);
|
解析
1
| 将字符串转成Date,这个过程叫做解析;对应的方法名: parse(字符串);
|
Calendar
概述
是java7提供的一个用于表示日历的类,可以对时间进行推移运算;
使用方式
- 利用静态方法获取对象;
- 面向对象,调用方法;
常用方法
代码案例
1
2
3
4
5
6
7
8
9
10
11
12
13
14
15
16
17
18
| import java.util.Calendar;
public class MyCalendar {
public static void main(String[] args) {
Calendar ins = Calendar.getInstance();
int y = ins.get(Calendar.YEAR);
int m = ins.get(Calendar.MONTH);
int d = ins.get(Calendar.DATE);
System.out.println("年份为:" + y + "; 月份为:" + m + "; 日期为:" + d);
ins.add(Calendar.MONTH, -1);
System.out.println(ins.get(Calendar.MONTH));
}
}
|
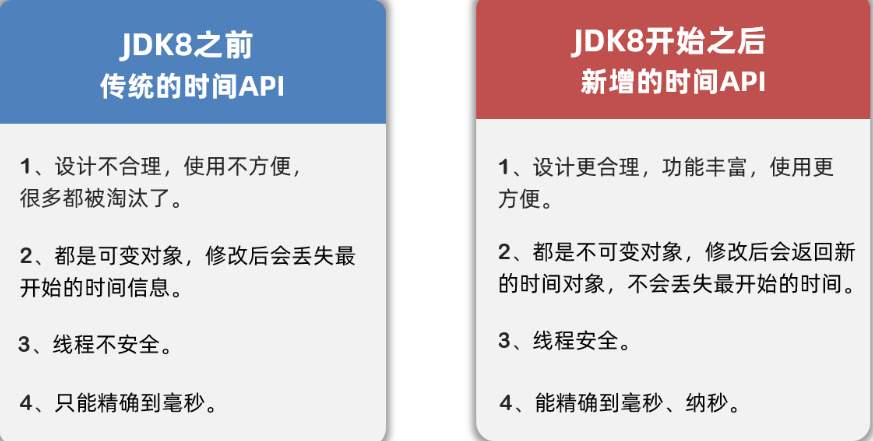
JDK7和8日期类比较
JDK8新增的日期类分得更细致一些,比如表示年月日用LocalDate类、表示时间秒用LocalTime类、而表示年月日时分秒用LocalDateTime类等;除了这些类还提供了对时区、时间间隔进行操作的类等,用起来特别方便。
详细说明
JDK8日期
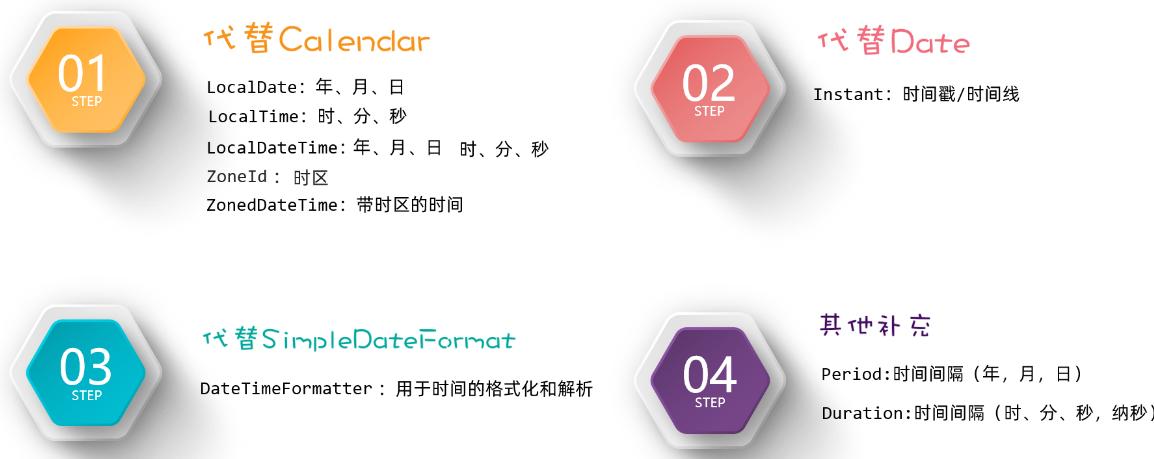
Notes: 这里part1,2,3,4是上图中的四大模块。
PART1
LocalDate、LocalTime、以及LocalDateTime类。这三个类的用法基本大同小异,由于我之前偷懒就写了一个Demo,这里就copy一下别人的代码。
LocalDate类的基本使用
1
2
3
4
5
6
7
8
9
10
11
12
13
14
15
16
17
18
19
20
21
22
23
24
25
26
27
28
29
30
31
32
33
34
35
36
37
38
39
40
41
| public class Test1_LocalDate {
public static void main(String[] args) {
LocalDate ld = LocalDate.now();
System.out.println(ld);
int year = ld.getYear();
int month = ld.getMonthValue();
int day = ld.getDayOfMonth();
int dayOfYear = ld.getDayOfYear();
int dayOfWeek = ld.getDayOfWeek().getValue();
System.out.println(year);
System.out.println(day);
System.out.println(dayOfWeek);
LocalDate ld2 = ld.withYear(2099);
LocalDate ld3 = ld.withMonth(12);
System.out.println(ld2);
System.out.println(ld3);
System.out.println(ld);
LocalDate ld4 = ld.plusYears(2);
LocalDate ld5 = ld.plusMonths(2);
LocalDate ld6 = ld.minusYears(2);
LocalDate ld7 = ld.minusMonths(2);
LocalDate ld8 = LocalDate.of(2099, 12, 12);
LocalDate ld9 = LocalDate.of(2099, 12, 12);
System.out.println(ld8.equals(ld9));
System.out.println(ld8.isAfter(ld));
System.out.println(ld8.isBefore(ld));
}
}
|
LocalTime类的基本使用
1
2
3
4
5
6
7
8
9
10
11
12
13
14
15
16
17
18
19
20
21
22
23
24
25
26
27
28
29
30
31
32
33
34
35
36
37
38
39
40
41
42
| public class Test2_LocalTime {
public static void main(String[] args) {
LocalTime lt = LocalTime.now();
System.out.println(lt);
int hour = lt.getHour();
int minute = lt.getMinute();
int second = lt.getSecond();
int nano = lt.getNano();
LocalTime lt3 = lt.withHour(10);
LocalTime lt4 = lt.withMinute(10);
LocalTime lt5 = lt.withSecond(10);
LocalTime lt6 = lt.withNano(10);
LocalTime lt7 = lt.plusHours(10);
LocalTime lt8 = lt.plusMinutes(10);
LocalTime lt9 = lt.plusSeconds(10);
LocalTime lt10 = lt.plusNanos(10);
LocalTime lt11 = lt.minusHours(10);
LocalTime lt12 = lt.minusMinutes(10);
LocalTime lt13 = lt.minusSeconds(10);
LocalTime lt14 = lt.minusNanos(10);
LocalTime lt15 = LocalTime.of(12, 12, 12);
LocalTime lt16 = LocalTime.of(12, 12, 12);
System.out.println(lt15.equals(lt16));
System.out.println(lt15.isAfter(lt));
System.out.println(lt15.isBefore(lt));
}
}
|
LocalDateTime类的基本使用
1
2
3
4
5
6
7
8
9
10
11
12
13
14
15
16
17
18
19
20
21
22
23
24
25
26
27
28
29
30
31
32
33
34
35
36
37
38
39
40
41
42
43
44
45
46
47
48
49
50
51
52
53
54
55
| public class Test3_LocalDateTime {
public static void main(String[] args) {
LocalDateTime ldt = LocalDateTime.now();
System.out.println(ldt);
int year = ldt.getYear();
int month = ldt.getMonthValue();
int day = ldt.getDayOfMonth();
int dayOfYear = ldt.getDayOfYear();
int dayOfWeek = ldt.getDayOfWeek().getValue();
int hour = ldt.getHour();
int minute = ldt.getMinute();
int second = ldt.getSecond();
int nano = ldt.getNano();
LocalDateTime ldt2 = ldt.withYear(2029);
LocalDateTime ldt3 = ldt.withMinute(59);
LocalDateTime ldt4 = ldt.plusYears(2);
LocalDateTime ldt5 = ldt.plusMinutes(3);
LocalDateTime ldt6 = ldt.minusYears(2);
LocalDateTime ldt7 = ldt.minusMinutes(3);
LocalDateTime ldt8 = LocalDateTime.of(2029, 12, 12, 12, 12, 12, 1222);
LocalDateTime ldt9 = LocalDateTime.of(2029, 12, 12, 12, 12, 12, 1222);
System.out.println(ldt9.equals(ldt8));
System.out.println(ldt9.isAfter(ldt));
System.out.println(ldt9.isBefore(ldt));
LocalDate ld = ldt.toLocalDate();
LocalTime lt = ldt.toLocalTime();
LocalDateTime ldt10 = LocalDateTime.of(ld, lt);
}
}
|
ZoneId时区
概述
获取方法
1
2
3
| 利用静态方法 of(字符串时区); 获取指定时区对象
利用静态方法 systemDefault();获取当前系统默认时区对象
利用静态方法 getAvailableZoneIds();获取当前系统支持的所有时区对象
|
应用场景
1
| 把时区对象,当成 ZoneDateTime的参数,获取一个带时区的日期对象;
|
代码案例
1
2
3
4
5
6
7
8
9
10
11
12
13
14
15
16
17
18
19
20
21
22
23
| import java.time.ZoneId;
import java.time.ZonedDateTime;
public class MyZoneDate {
public static void main(String[] args) {
System.out.println(ZoneId.systemDefault());
System.out.println(ZoneId.getAvailableZoneIds());
ZoneId of = ZoneId.of("America/New_York");
System.out.println(of);
System.out.println(ZonedDateTime.now());
System.out.println(ZonedDateTime.now(of));
System.out.println(ZonedDateTime.now(of).getDayOfMonth());
}
}
|
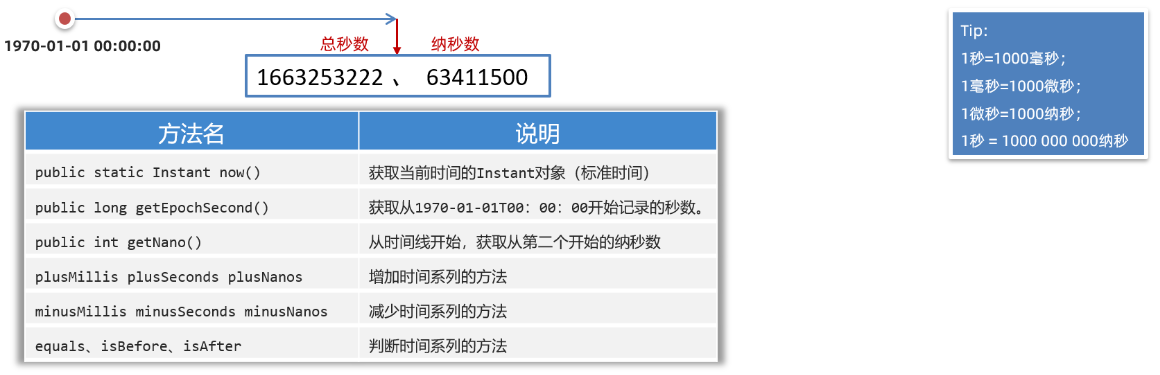
PART2(Instant)
通过获取Instant的对象可以拿到此刻的时间,该时间由两部分组成:从1970-01-01 00:00:00 开始走到此刻的总秒数+不够1秒的纳秒数。
概述
获取方法
常用方法
代码案例
1
2
3
4
5
6
7
8
9
10
11
12
13
14
15
16
17
18
19
| import java.time.Instant;
public class MyInstant {
public static void main(String[] args) {
Instant now = Instant.now();
System.out.println(now);
System.out.println(now.getEpochSecond());
System.out.println(System.currentTimeMillis());
Instant instant = now.plusSeconds(-30);
System.out.println(instant);
}
}
|
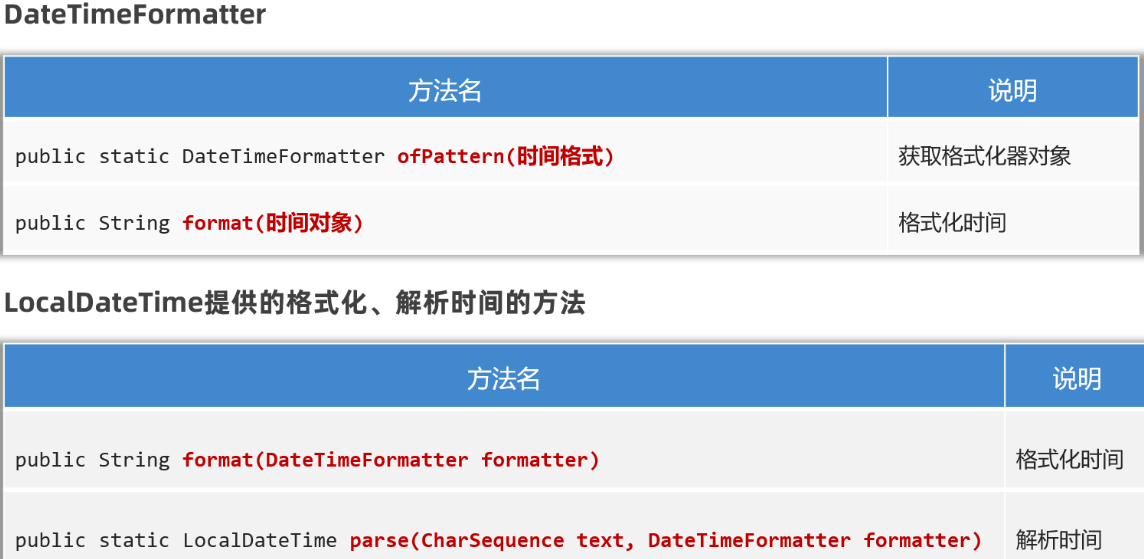
概述
1
| 是jdk8提供的日期格式化的工具类,可以当成日期格式化和解析日期时候的参数使用;
|
获取方式
1
| 静态方法: ofPattern("模式字符串");
|
解析和格式化的方法
- 解析,使用 日期类(LocalDateTime)中的静态方法 parse,传递要解析的字符串和格式化工具对象;
- 格式化,使用 日期对象 format(格式化工具对象);
代码案例
1
2
3
4
5
6
7
8
9
10
11
12
13
14
15
16
|
public class MyDateTimeFormatter {
public static void main(String[] args) {
DateTimeFormatter sf = DateTimeFormatter.ofPattern("yyyy-MM-dd HH:mm:ss");
LocalDateTime now = LocalDateTime.now();
System.out.println(now.format(sf));
LocalDateTime dt = LocalDateTime.parse("2021-01-01 11:11:11", sf);
System.out.println(dt);
}
}
|
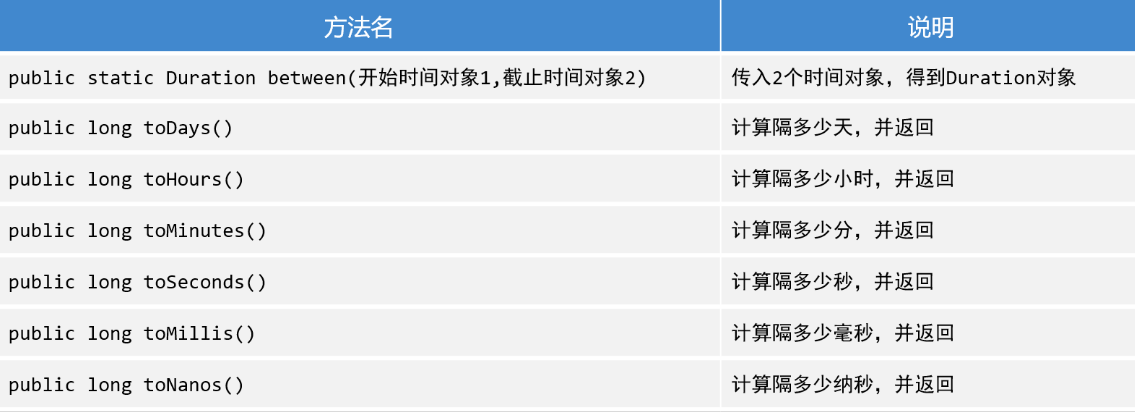
PART4(Period&Duration)
概述
1
| 把一个时间段看成了对象,让程序员可以面向这个时间段操作;
|
分类
Period: 粗粒度间隔对象
Duration: 细粒度间隔对象
获取方式
利用静态方法 between(两个时间对象)
注意事项
Period能操作只能操作LocalDate;
Duration只能操作带毫秒的时间对象;(除了LocalDate之外的时间对象)
常用方法
- getXxx(); 获取信息或 toXxx()获取信息
- Period
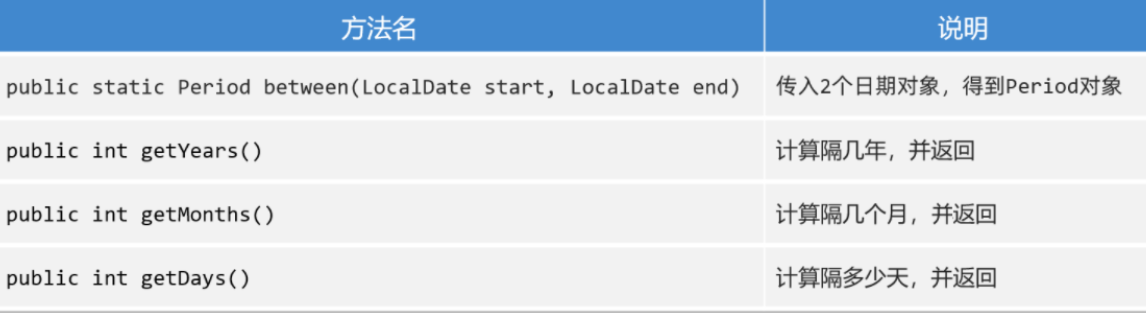
- Duration
Period代码案例
1
2
3
4
5
6
7
8
9
10
11
12
13
14
| public class PeriodTest {
public static void main(String[] args) {
LocalDate now = LocalDate.now();
LocalDate of = LocalDate.of(2024, 1, 9);
Period between = Period.between(of, now);
System.out.println(between.getYears());
System.out.println(between.getMonths());
System.out.println(between.getDays());
System.out.println(between.toTotalMonths());
}
}
|
Duration代码案例
1
2
3
4
5
6
7
8
9
10
11
12
13
14
15
16
17
18
19
20
|
public class DurationTest {
public static void main(String[] args) {
LocalDateTime now = LocalDateTime.now();
LocalDateTime of = LocalDateTime.of(2024, 1, 25, 01, 02, 03);
Duration between = Duration.between(of, now);
System.out.println(between.toDays());
System.out.println(between.toHours());
}
}
|
Lambda表达式
什么是Lambda表达式:用于简化匿名内部类代码的书写。
Lambda表达式基本使用
Lamdba是有特有的格式的,按照下面的格式来编写Lamdba。
1
2
3
| (被重写方法的形参列表) -> {
被重写方法的方法体代码;
}
|
需要给说明一下的是,在使用Lambda表达式之前,必须先有一个接口,而且接口中只能有一个抽象方法。(注意:不能是抽象类,只能是接口),使用Lambda来实现该接口,就形成了Lambda表达式。
而在使用Lambda的时候的参数则参考接口中的抽象方法需不需要参数及返回值
像这样的接口,我们称之为函数式接口(FunctionInterface),只有基于函数式接口的匿名内部类才能被Lambda表达式简化。
像这样
1
2
3
4
| @FunctionalInterface
public interface Swimming{
void swim();
}
|
代码案例
1
2
3
4
5
6
7
8
9
10
11
12
13
14
15
16
17
18
19
20
21
22
23
24
25
| JAVA
public interface Swimming {
void swim();
}
public class LambdaTest {
public static void main(String[] args) {
go(new Swimming() {
@Override
public void swim() {
System.out.println("匿名内部类方法执行了");
}
});
go(() -> {
System.out.println("Lambda表达式执行了");
});
}
public static void go(Swimming s){
s.swim();
}
}
|
使用Lambda简化数组排序
基本类型数组
由于接口Comparable只能传递泛型,所以基本类型不能作为参数传递进去,这里基本类型只能对其长度进行规则排序。
代码案例
1
2
3
4
5
6
7
8
9
10
11
12
13
14
15
16
17
18
19
20
21
| JAVA
import java.util.Arrays;
import java.util.Comparator;
public class MyStringTest {
public static void main(String[] args) {
String[] arr = {"a", "bb", "ccc", "dddd", "e"};
Arrays.sort(arr, new Comparator<String>() {
@Override
public int compare(String o1, String o2) {
return o1.length() - o2.length();
}
});
System.out.println(Arrays.toString(arr));
System.out.println("可以使用Lambda表达式简化对数组的排序规则");
Arrays.sort(arr, (a, b) -> b.length() - a.length());
System.out.println(Arrays.toString(arr));
}
}
|
泛型类型数组
代码案例
1
2
3
4
5
6
7
8
9
10
11
12
13
14
15
16
17
18
19
20
| JAVA
public class LambdaStringSort {
public static void main(String[] args) {
Integer[] arr = {1, 5, 8, 2, 3, 9, 6};
Arrays.sort(arr, new Comparator<Integer>() {
@Override
public int compare(Integer o1, Integer o2) {
return o1 - o2;
}
});
System.out.println(Arrays.toString(arr));
System.out.println("使用Lambda对其进行简化");
Arrays.sort(arr, (a, b) -> b - a);
System.out.println(Arrays.toString(arr));
}
}
|
Lambda表达式省略规则(※)
Java觉得代码还不够简单,于是还提供了Lamdba表达式的几种简化写法。具体的简化规则如下
1
2
3
4
5
6
7
8
9
10
11
12
13
14
15
16
17
18
| PROPERTIES
1.Lambda的标准格式
(参数类型1 参数名1, 参数类型2 参数名2)->{
...方法体的代码...
return 返回值;
}
2.在标准格式的基础上()中的参数类型可以直接省略
(参数名1, 参数名2)->{
...方法体的代码...
return 返回值;
}
3.如果{}总的语句只有一条语句,则{}可以省略、return关键字、以及最后的“;”都可以省略
(参数名1, 参数名2)-> 结果
4.如果()里面只有一个参数,则()可以省略
(参数名)->结果
|
代码案例
1
2
3
4
5
6
7
8
9
10
11
12
13
14
15
16
17
18
19
20
21
22
23
24
25
26
27
28
29
30
31
32
33
34
35
36
37
38
39
40
41
42
43
44
45
46
47
48
49
50
51
52
53
54
55
56
57
58
59
60
| JAVA
public class LambdaTest2 {
public static void main(String[] args) {
double[] prices = {99.8, 128, 100};
Arrays.setAll(prices, new IntToDoubleFunction() {
@Override
public double applyAsDouble(int value) {
return prices[value] * 0.8;
}
});
Arrays.setAll(prices, (int value) -> {
return prices[value] * 0.8;
});
Arrays.setAll(prices, (value) -> {
return prices[value] * 0.8;
});
Arrays.setAll(prices, value -> {
return prices[value] * 0.8;
});
Arrays.setAll(prices, value -> prices[value] * 0.8 );
System.out.println(Arrays.toString(prices));
System.out.println("------------------------------------
Student[] students = new Student[4];
students[0] = new Student("蜘蛛精", 169.5, 23);
students[1] = new Student("紫霞", 163.8, 26);
students[2] = new Student("紫霞", 163.8, 26);
students[3] = new Student("至尊宝", 167.5, 24);
//1.使用匿名内部类
Arrays.sort(students, new Comparator<Student>() {
@Override
public int compare(Student o1, Student o2) {
return Double.compare(o1.getHeight(), o2.getHeight()); // 升序
}
});
//2.使用Lambda表达式表达式——标准格式
Arrays.sort(students, (Student o1, Student o2) -> {
return Double.compare(o1.getHeight(), o2.getHeight()); // 升序
});
//3.使用Lambda表达式表达式——省略参数类型
Arrays.sort(students, ( o1, o2) -> {
return Double.compare(o1.getHeight(), o2.getHeight()); // 升序
});
//4.使用Lambda表达式表达式——省略{}
Arrays.sort(students, ( o1, o2) -> Double.compare(o1.getHeight(), o2.getHeight()));
System.out.println(Arrays.toString(students));
}
}
|
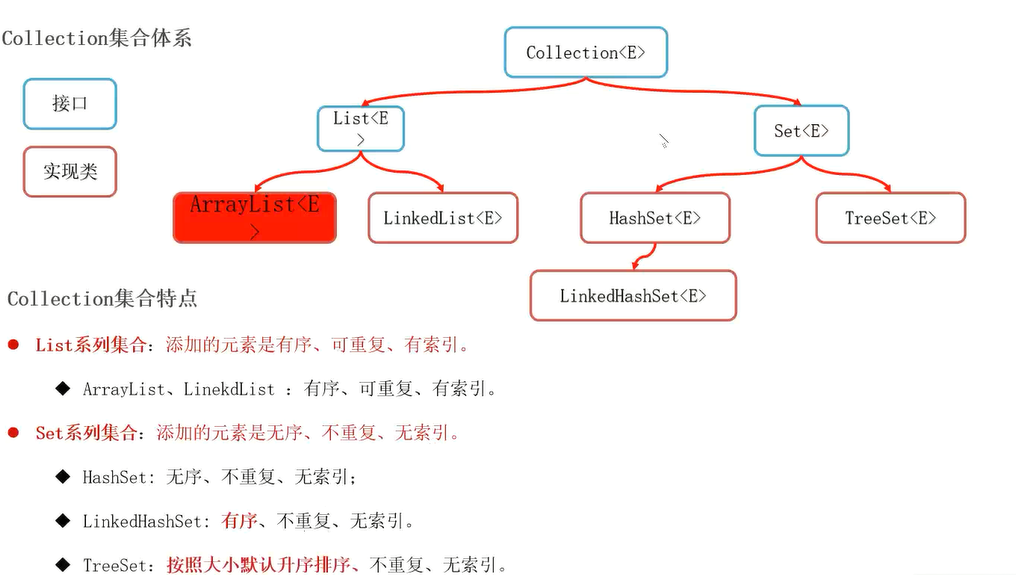
集合Collection
单列集合派系(List&Set)
单列集合是单个的元素,类似于Python中的列表。
容器中的数据都是相互独立的,互不干涉;
Collection集合常用方法
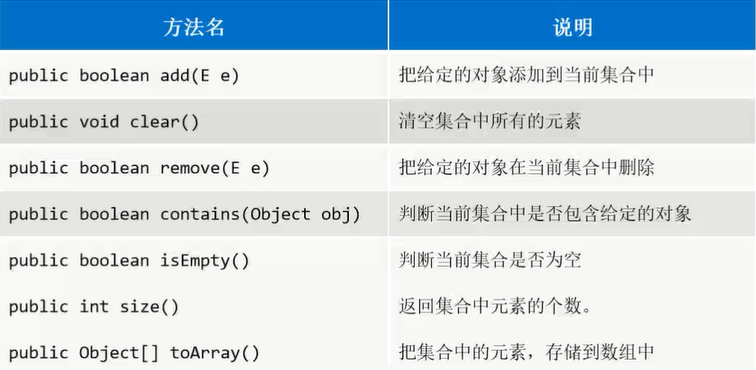
代码案例(演示常用方法)
1
2
3
4
5
6
7
8
9
10
11
12
13
14
15
16
17
18
19
20
21
22
23
24
25
| public class MyCollection {
public static void main(String[] args) {
Collection<String> c = new ArrayList<>();
c.add("aa");
c.add("bb");
c.add("cc");
Collection<String> c2 = new ArrayList<>();
System.out.println(c);
System.out.println(c2);
c2.addAll(c);
System.out.println(c2);
System.out.println(c2.contains(new String("dd")));
String[] arr = new String[c.size()];
c.toArray(arr);
System.out.println(Arrays.toString(arr));
}
}
|
List列表
List 主要分为ArrayList和LinkedList两种类型的列表。
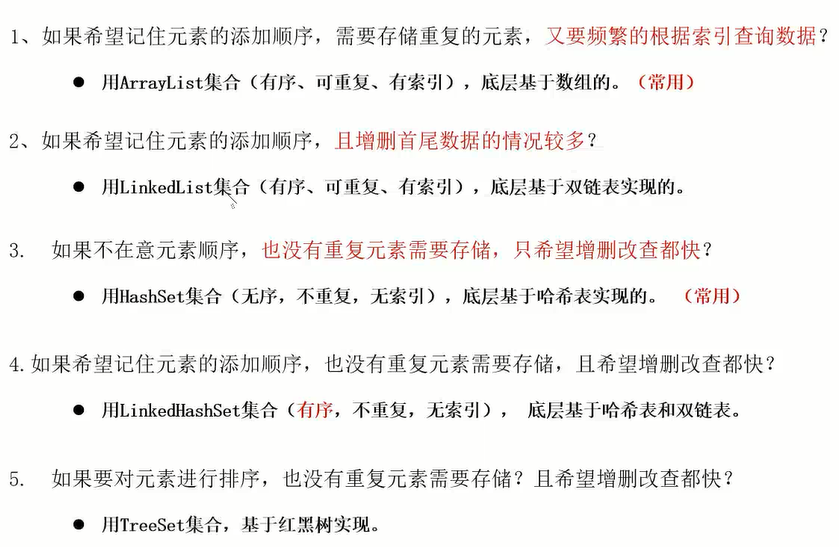
记住:list集合的特点是:带索引→元素有序,元素可重复。
ArrayList集合特点
是数组结构,增删慢,查询快;适合经常查询,很少增删的场景;
LinkedList集合的特点
是双向链表结构,增删快,查询慢;适合经常增删或经常操作首尾,很少查询的场景;
ArrayList代码案例(多态)
上面Collection代码案例就是。
Set集合
Set 集合最大的特点就是:不带索引 →元素无序,元素不可重复。
HashSet
特点
同一个对象,多次调用hashCode方法一定可以得到一个相同的值;
如果两个对象比较的结果是true,那么哈希值一定相同;
如果两个对象比较的结果是false,那么哈希值可能相同也可能不同;
- 比如说没有重写hashcode和equals方法的时候
结论
如果使用Hash结构的集合,去除重复元素的依据有两个:
- 依赖对象的哈希值;(决定对象在哈希表中存储的位置)
- 依赖对象的equals方法;(确保安全)
1
2
3
4
5
6
7
8
9
10
11
12
13
14
15
16
17
18
19
20
21
22
23
24
25
26
27
28
29
30
31
32
33
34
35
36
37
38
39
40
41
42
43
44
45
46
47
48
49
50
51
52
53
54
55
56
57
58
59
60
61
62
63
64
65
66
67
68
69
70
71
72
|
public class Student {
private String name;
private int age;
@Override
public boolean equals(Object o) {
if (this == o) return true;
if (o == null || getClass() != o.getClass()) return false;
Student student = (Student) o;
if (age != student.age) return false;
return Objects.equals(name, student.name);
}
@Override
public int hashCode() {
int result = name != null ? name.hashCode() : 0;
result = 31 * result + age;
return result;
}
@Override
public String toString() {
return "Student{" +
"name='" + name + '\'' +
", age=" + age +
'}';
}
public String getName() {
return name;
}
public void setName(String name) {
this.name = name;
}
public int getAge() {
return age;
}
public void setAge(int age) {
this.age = age;
}
public Student(String name, int age) {
this.name = name;
this.age = age;
}
}
public class TestHashSet {
public static void main(String[] args) {
HashSet<Student> set = new HashSet<>();
Student s1 = new Student("张三", 18);
Student s2 = new Student("张三", 18);
Student s3 = new Student("张三", 18);
set.add(s1);
set.add(s2);
set.add(s3);
System.out.println(set);
System.out.println(s1.hashCode());
System.out.println(s2.hashCode());
System.out.println(s3.hashCode());
}
}
|
Tips:
总结:HashSet添加对象的时候先调用的是Hashcode方法,如果没有重写Hashcode方法则三个属性相同的对象的hash值也不相同
TreeSet
是set系列的可以对元素自动排序的集合容器;(需要我们自己指定排序规则)
特点
- 可以排序
- 不能保证添加元素和获取元素顺序一致
- 无索引
- 不能添加重复的元素;(判定元素是否重复不依赖对象的hashcode和equals方法,仅仅依赖排序规则是否返回了0)
构造方法
- 空参数的构造方法
- 带比较器参数的构造方法;
常用方法
(参考Collection即可)
通过第三个代码案例:
- TreeSet判断元素重复的依据是看重写的排序Lambda方法是否返回了0
- 返回0表示重复
- 不为0表示不重复
- 如果在排序规则中直接写return 0,则TreeSet集合只会取第一个元素。
1
2
3
4
5
6
7
8
9
10
11
12
13
14
15
16
17
18
19
20
21
22
23
24
25
26
27
28
29
30
31
32
33
34
35
36
37
38
39
40
41
42
43
44
45
46
47
48
49
50
51
52
53
54
55
56
|
public class TreeSetSimple {
public static void main(String[] args) {
TreeSet<Integer> set = new TreeSet<>();
set.add(22);
set.add(22);
set.add(11);
set.add(88);
set.add(22);
set.add(99);
System.out.println(set);
}
}
public class TreeSetSimple {
public static void main(String[] args) {
TreeSet<Integer> set = new TreeSet<>((a, b) -> b -a);
set.add(22);
set.add(22);
set.add(11);
set.add(88);
set.add(22);
set.add(99);
System.out.println(set);
}
}
public class MyTreeset {
public static void main(String[] args) {
TreeSet<Student> set = new TreeSet<>((stu1, stu2)->{
int res = stu2.getAge() - stu1.getAge();
return res!=0?res:stu1.getName().compareTo(stu2.getName());
});
Student s1 = new Student("abc", 18);
Student s2 = new Student("abc", 18);
Student s3 = new Student("ZZz", 22);
Student s4 = new Student("xyz", 19);
Student s5 = new Student("xyz", 18);
set.add(s1);
set.add(s2);
set.add(s3);
set.add(s4);
set.add(s5);
System.out.println(set);
}
}
|
单列集合总结
单列结合综合案例(斗地主)
一个比较综合的案例吧,但只是关于单列集合的,主要知识点有:
ArrayList作为原始的扑克排面,里面存放的是牌对象,牌对象的属性包含牌面和编号(注意这个编号是不变的且不能重复的,是作为牌的一个唯一性标识,类似于数据库中的主键)使用Collections工具类对集合中的元素打散。- 对三名玩家进行发牌,以及留三张底牌,最后打印这
四个TreeSet的所有牌面。
代码案例
1
2
3
4
5
6
7
8
9
10
11
12
13
14
15
16
17
18
19
20
21
22
23
24
25
26
27
28
29
30
31
32
33
34
35
36
37
38
39
40
41
42
43
44
45
46
47
48
49
50
51
52
53
54
55
56
57
58
59
60
61
62
63
64
65
66
67
68
69
70
71
72
73
74
75
76
77
78
79
80
81
82
83
84
85
86
87
88
89
90
91
92
93
94
95
96
97
98
99
100
101
102
103
104
|
public class Pai {
private String mian;
@Override
public String toString() {
return mian;
}
private int zhi;
public String getMian() {
return mian;
}
public void setMian(String mian) {
this.mian = mian;
}
public int getZhi() {
return zhi;
}
public void setZhi(int zhi) {
this.zhi = zhi;
}
public Pai() {
}
public Pai(String mian, int zhi) {
this.mian = mian;
this.zhi = zhi;
}
}
public class DDZ {
public static void main(String[] args) {
List<Pai> poke = new ArrayList<>();
List<String> huase = new ArrayList<>();
Collections.addAll(huase, "♠","♥","♣","♦");
List<String> dians = new ArrayList<>();
Collections.addAll(dians,"2","A","K","Q","J","10","9","8","7","6","5","4","3");
int zhi = 54;
Pai dawagn = new Pai("大王", zhi--);
Pai xiaowang = new Pai("小王", zhi--);
poke.add(dawagn);
poke.add(xiaowang);
for (String dian : dians) {
for (String s : huase) {
poke.add(new Pai(s+dian, zhi--));
}
}
Collections.shuffle(poke);
Comparator<Pai> rule = (a, b) -> b.getZhi() - a.getZhi() ;
TreeSet<Pai> wanjia1 = new TreeSet<>(rule);
TreeSet<Pai> wanjia2 = new TreeSet<>(rule);
TreeSet<Pai> wanjia3 = new TreeSet<>(rule);
TreeSet<Pai> dipai = new TreeSet<>(rule);
for (int i = 0; i < poke.size(); i++) {
Pai pai = poke.get(i);
if (i >= 51){
dipai.add(pai);
}else {
if (i % 3 == 1){
wanjia1.add(pai);
}else if (i % 3 == 2){
wanjia2.add(pai);
}else {
wanjia3.add(pai);
}
}
}
System.out.println(wanjia1);
System.out.println(wanjia2);
System.out.println(wanjia3);
System.out.println(dipai);
}
}
|
双列集合派系(Map)
Map集合是什么:
- 是双列集合顶层的接口,带有两个泛型,里面存储的都是键值对数据;(键和值一一对应,键不能重复,值可以重复)
- 其中双列集合可以理解为Python中的字典,是kv键值对形式。
特点
- 存储的都是键值对数据;
- 键不能重复,值可以重复;
Map集合体系
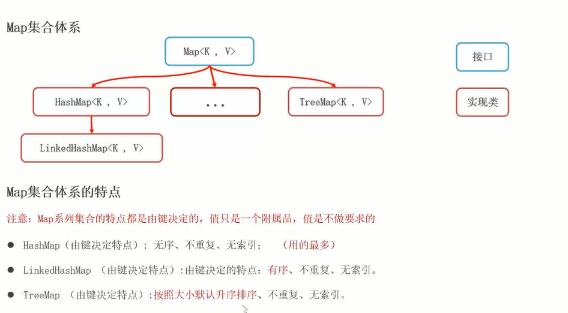
用的最多的:
Map集合常用方法
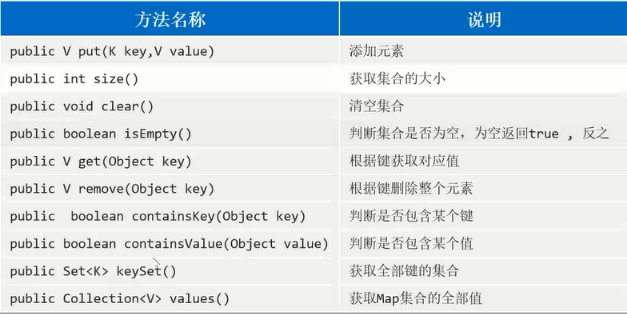
用的最多的:
添加元素:put()根据键来获取对应的值:get(key)获取全部键的集合:keySet()
代码案例
1
2
3
4
5
6
7
8
9
10
11
12
13
14
15
16
17
18
19
20
21
| public class MyMap {
public static void main(String[] args) {
Map<Integer, String> map = new HashMap<>();
System.out.println(map.put(120, "牛肉拉面"));
map.put(110, "兰州牛肉拉面");
map.put(130, "西北拉面");
System.out.println(map.put(120, "河南烩面"));
System.out.println(map);
System.out.println(map.get(110));
System.out.println(map.getOrDefault(111, "自定义的默认值"));
System.out.println("----------");
Set<Integer> set = map.keySet();
for (Integer i : set) {
System.out.println(i + "===>" + map.get(i));
}
}
}
|
双列集合之-Entry
可以将Map集合中的每一个键和值看成一个整体,整体类型是Map.Entry 类型
因为将键和值看成一个整体之后,Map就变成了单列集合,因此可以使用增强for进行遍历。
具体操作案例
1
2
3
4
5
6
7
8
9
10
11
12
13
14
15
16
17
18
19
| public class MapEntry {
public static void main(String[] args) {
Map<Integer, String> map = new HashMap<>();
map.put(120, "牛肉拉面");
map.put(110, "兰州牛肉拉面");
map.put(130, "西北拉面");
map.put(120, "河南烩面");
Set<Map.Entry<Integer, String>> set = map.entrySet();
for (Map.Entry<Integer, String> entry : set) {
Integer key = entry.getKey();
String value = entry.getValue();
System.out.println(key +"===>" + value);
}
}
}
|
Map集合的三种遍历方式
第一种遍历方式:
- 通过获取集合中所有键的集合,然后根据键来获取集合中所有的值。
第二种遍历方式:
- 通过将键值对看成一个Entry整体,通过增强for的方式遍历集合
第三种遍历方式:
使用forEach结合Lambda表达式进行遍历(方便快捷)
前面两种方式基本都没有什么难度,下面直接使用第三种最快接的遍历方式,上代码!
代码案例
这里最 需要关注的就是集合的第三种遍历方式,通过ForEach+Lambda.
1
2
3
4
5
6
7
8
9
10
11
12
13
14
15
16
17
18
19
20
21
22
23
24
25
26
27
28
29
30
31
32
33
34
|
public class MapVoteDemo {
public static void main(String[] args) {
String[] arr = {"D","A","D","C","B","B","D","A","D","C","A"};
Map<String, Integer> map = new HashMap<>();
for (String s : arr) {
map.put(s, map.getOrDefault(s, 0)+1);
}
System.out.println(map);
Collection<Integer> values = map.values();
Integer max = Collections.max(values);
System.out.println(max);
map.forEach((k,v)->{
if (v == max){
System.out.println(k + "景点人数是最多的,人数为:"+v);
}
});
}
}
|
应用场景(统计词频)
1
2
3
4
5
6
7
8
9
10
11
12
13
14
15
16
17
18
|
public class CharFrequency {
public static void main(String[] args) {
Scanner sc = new Scanner(System.in);
System.out.println("请输入一串字符串:");
String next = sc.next();
Map<Character, Integer> map = new HashMap<>();
for (int i = 0; i < next.length(); i++) {
char c = next.charAt(i);
map.put(c, map.getOrDefault(c, 0)+1);
}
System.out.println(map);
}
}
|
HashMap
HashMap就是Map接口中的一个实现类,底层是HashTable表结构,会根据键来进行去重,根据键去重的依据是equals和HashCode方法
1
2
3
4
5
6
7
8
9
10
11
12
13
14
15
16
17
|
public class CustomerizeKey {
public static void main(String[] args) {
HashMap<Student, String> map = new HashMap<>();
Student s1 = new Student("张三", 18);
Student s2 = new Student("张三2", 19);
Student s3 = new Student("张三", 18);
map.put(s1, "河南");
map.put(s2, "河北");
map.put(s3, "山东");
System.out.println(map);
}
}
|
LinkedHashMap
就是HashMap的一个子类,可以保证数据有序,其他的都和HashMap一样。
其顺序的是现实通过元素添加的顺序来维护的,键的进栈顺序。
1
2
3
4
5
6
7
8
9
10
11
12
13
14
15
16
17
18
19
20
21
|
public class MyLinkedHashMap {
public static void main(String[] args) {
LinkedHashMap<Student, String> map = new LinkedHashMap<>();
Student s1 = new Student("张三", 18);
Student s2 = new Student("张三2", 19);
Student s3 = new Student("张三", 18);
Student s4 = new Student("张三3", 18);
map.put(s1, "河南");
map.put(s2, "河北");
map.put(s3, "山东");
map.put(s4, "山洞");
System.out.println(map);
}
}
|
TreeMap
可以对键按自定义规则排序, TreeMap 判断键是否重复的条件是 排序Lambda是否返回了0;
1
2
3
4
5
6
7
8
9
10
11
12
13
14
15
16
17
18
19
20
21
22
23
24
|
public class MyTreeMap {
public static void main(String[] args) {
Map<Student, String> map = new TreeMap<>((stu1, stu2) -> {
int i = stu2.getAge() - stu1.getAge();
return i == 0 ? stu2.getName().compareTo(stu2.getName()) : i;
});
Student s1 = new Student("张三", 18);
Student s2 = new Student("张三2", 19);
Student s3 = new Student("张三", 18);
Student s4 = new Student("张三3", 18);
map.put(s1, "河南");
map.put(s2, "河北");
map.put(s3, "山东");
map.put(s4, "山洞");
System.out.println(map);
}
}
|
集合嵌套(三种遍历)
需求说明:定义一个map集合,使用省的名称当成键,使用省中的各个市的名称当成value;也就是一个省对应多个市
重点在于:使用三种不同的方式遍历嵌套的集合。
1
2
3
4
5
6
7
8
9
10
11
12
13
14
15
16
17
18
19
20
21
22
23
24
25
26
27
28
29
30
31
32
33
34
35
36
37
38
39
40
41
42
43
| public class CollectionNested {
public static void main(String[] args) {
HashMap<String, HashSet<String>> map = new HashMap<>();
HashSet<String> hn = new HashSet<>();
Collections.addAll(hn, "周口市","洛阳市","南阳市","信阳市","濮阳市");
HashSet<String> hb = new HashSet<>();
Collections.addAll(hb, "石家庄","张家口","唐山市","保定市");
map.put("河南", hn);
map.put("河北", hb);
Set<String> set = map.keySet();
for (String province : set) {
HashSet<String> citys = map.get(province);
for (String city : citys) {
System.out.println(province+"下面有:"+city);
}
System.out.println("======");
}
System.out.println("-------方式一结束-------");
Set<Map.Entry<String, HashSet<String>>> entries = map.entrySet();
for (Map.Entry<String, HashSet<String>> entry : entries) {
String province = entry.getKey();
HashSet<String> citys = entry.getValue();
for (String city : citys) {
System.out.println(province + "下面有:" +city);
}
System.out.println("=====");
}
System.out.println("-------方式二结束-------");
map.forEach((a, b) -> {
for (String s : b) {
System.out.println(a+"下面有:"+s);
}
System.out.println("=====");
});
}
}
|
迭代器
概述
专门针对集合进行遍历的一个对象;(集合的助手)
如果想使用迭代器遍历集合:
- 首先需要有一个集合对象。
- 其次面向集合对象通过:集合对象.iterator()的形式获取一个迭代器对象。
- 最后面向迭代器对象,遍历集合中的所有元素。
获取方式
1
| 利用集合的 iterator()方法即可获取迭代器对象;
|
常用方法
- hasNext(); 判断是否有元素可以获取;
- next(); 获取元素;
- remove();删除当前遍历到的这个元素;
代码案例
1
2
3
4
5
6
7
8
9
10
11
12
13
14
15
16
17
18
19
20
21
22
|
public class IteratorTest {
public static void main(String[] args) {
Collection<String> c = new ArrayList<>();
c.add("aa");
c.add("bb");
c.add("cc");
c.add("cc");
c.add("cc");
c.add("cc");
Iterator<String> it = c.iterator();
while (it.hasNext()){
System.out.println(it.next());
}
}
}
|
迭代器使用注意事项
- 在迭代器迭代集合的过程中,不能使用集合的方法改变集合的长度;
- 在一次遍历过程中,最多只能使用一次 next方法,否则可能会出问题;
1
2
3
4
5
6
7
8
9
10
11
12
13
14
15
16
17
18
19
20
21
22
23
24
| public class IteratorDemo {
public static void main(String[] args) {
Collection<String> c = new ArrayList<>();
c.add("aa");
c.add("bb");
c.add("cc");
c.add("dd");
c.add("dd");
c.add("dd");
Iterator<String> it = c.iterator();
while (it.hasNext()){
String next = it.next();
System.out.println(next);
if (next.equals("dd")){
it.remove();
}
}
System.out.println(c);
}
}
|
删除集合元素的方法
增强for
概述&实例演示
对迭代器和数组遍历方式的语法格式简化。我要是不知道Python中for循环的两种遍历格式,还就真被这个b骗了。
就是一丫的for in in list这种东西,不要认为有多么的高大上,其实Python大家都知道很大一部分简化了Java的代码。
遍历单列集合或数组;
1
2
3
| for(元素类型 变量名:容器){
此时的变量名就是容器中的每一个元素
}
|
1
2
3
4
5
6
7
8
9
10
11
12
13
14
15
16
17
18
19
20
21
22
23
24
25
26
| import java.util.ArrayList;
import java.util.Collection;
public class EnhanceFor {
public static void main(String[] args) {
Collection<String> c = new ArrayList<>();
c.add("aa");
c.add("bb");
c.add("cc");
c.add("cc");
c.add("cc");
for (String i:c){
System.out.println(i);
}
}
}
|
集合中与Lambda相关的两个方法
forEach(lambda)
遍历集合;
- 使用方法:使用
集合名称.forEach(lambda)
removeIf(lambda)
删除所有满足规则的数据;
代码案例
1
2
3
4
5
6
7
8
9
10
11
12
13
14
15
16
17
18
19
20
21
22
23
24
25
26
27
28
29
30
31
32
33
|
public class CollectionWithLambda {
public static void main(String[] args) {
Collection<String> c = new ArrayList<>();
c.add("aa");
c.add("A");
c.add("bb");
c.add("dd");
c.add("cc");
c.add("cc");
c.add("cc");
c.add("abc");
c.removeIf(s -> s.equals("cc"));
System.out.println(c.toString());
c.removeIf(s -> s.length() == 2);
c.forEach(System.out::println);
Object[] array = c.toArray();
System.out.println(Arrays.toString(array));
}
}
|
集合工具类Collections
Collections工具类是一个专门操作集合的工具类,通过类名.方法名即可调用集合中的方法。
常见的操作有:
- 批量添加数据:
Collections.addAll
- 排序:
Collections.sort(集合, 比较器)
- 随机打散:
Collections.shuffle
1
2
3
4
5
6
7
8
9
10
11
12
13
14
15
| public class CollectionTools {
public static void main(String[] args) {
List<Integer> list = new ArrayList<>();
Collections.addAll(list, 2, 5, 8, 3, 6, 9, 1, 4, 7);
System.out.println(list);
Collections.sort(list, (a, b)-> a-b);
System.out.println(list);
Collections.shuffle(list);
System.out.println(list);
}
}
|
可变参数
关于可变参数就记住两点就行:语法格式 和 本质。
可变参数就是类似于Python中的*args, **kwargs,其中*args会将函数的参数以元组的形式保存起来,**kwargs会将多余的参数以键值对的方式保存起来。
语法格式为:
本质:数组,但是比数组接受更多情况的实际参数。
1
2
3
4
5
6
7
8
9
10
11
12
13
14
15
16
17
| public class FlexiblePara {
public static void main(String[] args) {
System.out.println(getSum(2, 5));
System.out.println(getSum(2, 5, 8));
System.out.println(getSum(1));
System.out.println(getSum());
int[] arr = {3, 6, 9};
System.out.println(getSum(arr));
}
public static int getSum(int...arr){
int sum = 0;
for (int i : arr) {
sum += i;
}
return sum;
}
}
|
正则表达式
正则表达式:编程界通用的一种工具。
这个东西,你只要能看懂各种符号就行,不用很熟,再熟不复习也会淡忘的,何况实际开发中如果真需要并且不会写就只要在网上搜索在线正则表达式就行。
匹配单个字符
. 任意单个字符[] 括号列举的字符/d 数字/D 非数字/s 空白 /S 非空白/w 非特殊字符(数字字母汉字下划线 /W 特殊字符
匹配多个字符
匹配前一个字符0到多次*匹配前一个字符1到多次+匹配前一个字符0-1次(非贪婪匹配)?匹配前一个字符m次 {m}匹配前一个字符至少m次 {m,}匹配前一个字符m到n次{m,n}
分组匹配
首先了解分组是什么东西!一个括号()中的东西就可以是一个分组.
对于分组的操作, 可以取分组中的|左右的任意字符,也可以对分组其别名,方便后面复用.
| 匹配左右任意一个表达式(ab) 将括号中字符作为一个分组\num 引用分组num匹配到的字符串(?P<name>) 分组起别名(?P=name) 引用别名为name分组匹配到的字符串
代码案例
验证数据是否正确
1
2
3
4
5
6
7
8
9
10
11
12
13
14
15
16
17
18
19
20
21
22
23
24
25
26
27
|
public class RegexApp_verifyData {
public static void main(String[] args) {
String email = "a-234@qq.com.cn.org";
String regEm= "[a-z0-9A-Z]+[-|a-z0-9A-Z._]+@([a-z0-9A-Z]+(-[a-z0-9A-Z]+)?\\.)+[a-z]{2,}";
System.out.println(email.matches(regEm));
String regPh = "0[0-9]{2,3}-[0-9]{7,8}";
String tel = "031-33333383";
System.out.println(tel.matches(regPh));
String regTime = "[1-9]\\d{3}-(0[1-9]|1[0-2])-(0[1-9]|[1-2][0-9]|3[0-1])\\s+(20|21|22|23|[0-1]\\d):[0-5]\\d:[0-5]\\d";
String time = "1999-11-11 12:12:12";
System.out.println(time.matches(regTime));
}
}
|
提取想要的数据
1
2
3
4
5
6
7
8
9
10
11
12
13
14
15
16
17
18
19
20
|
public class RegexApp_extractInfo {
public static void main(String[] args) {
String data = " 来xxx教育机构学习Java,电话:1866668888,18699997777 或者联系邮箱:boniu@itcast.cn, 座机电话:01036517895,010-98951256 邮箱:bozai@itcast.cn, 邮箱2:dlei0009@163.com, 热线电话:400-618-9090 ,400-618-4000,4006184000,4006189090";
String regex = "(\\w{1,}@\\w{2,10}(\\.\\w{2,10}){1,2})|(1[3-9]\\d{9})|(0\\d{2,5}-?\\d{5,15})|400-?\\d{3,8}-?\\d{3,8}";
Pattern compile = Pattern.compile(regex);
Matcher matcher = compile.matcher(data);
while (matcher.find()){
System.out.println(matcher.group());
}
}
}
|
异常
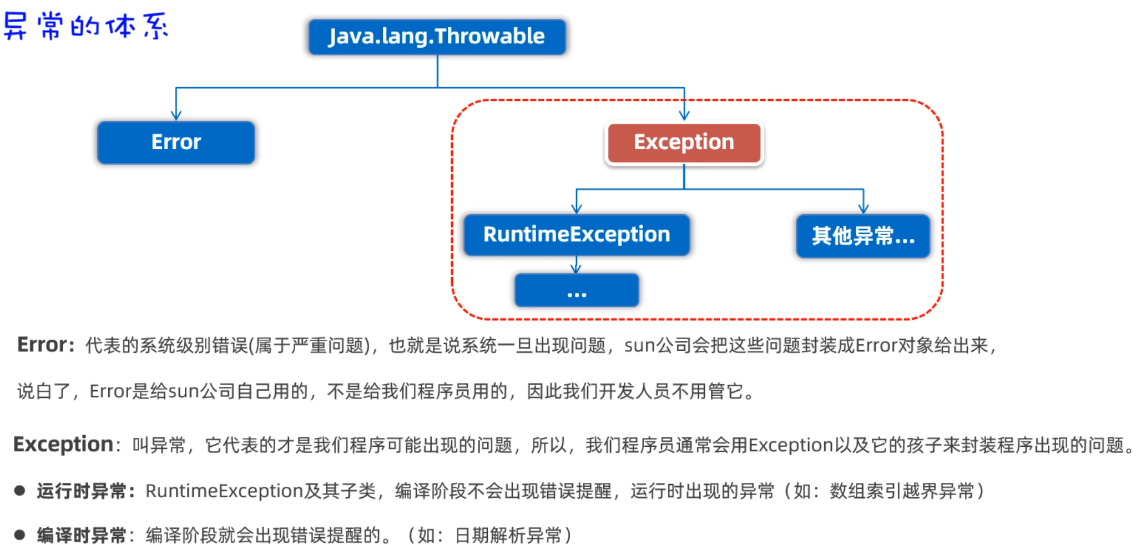
异常的体系
主要关心的就是编译时异常和运行时异常。
异常
异常处理的方法有两种:
- throws抛出异常
- 将方法内部出现的异常交给调用者处理
- 语法:
方法名 throws Exception1, Exception2.....
- try catch捕获异常
- 直接捕获程序中出现的异常
- 语法:
try {} catch(Exception e) {e.printStackTrace}

编译阶段的异常
大白话:就是在编译阶段出现的异常
1
2
3
4
5
6
7
8
9
10
11
12
13
14
15
16
17
|
public class CompileException {
public static void main(String[] args) throws ParseException{
SimpleDateFormat sdf = new SimpleDateFormat("yyyy-MM-dd HH:mm:ss");
try {
Date d = sdf.parse("2023-02-03 11-11-11");
System.out.println(d);
} catch (ParseException e) {
e.printStackTrace();
}
System.out.println("main结束!");
}
}
|
注意:
如果上面的没有在main方法后面加throws Exception且没有try catch处理则会编译报红

运行阶段的异常
顾名思义,如果单单在方法后使用throws 则会把异常踢给main函数的调用者,也就是jvm,跟throws拋不抛异常没多大区别,最终都是jvm来处理。
但是如果使用try catch就是自己来处理异常了。
1
2
3
4
5
6
7
8
9
10
11
12
13
14
15
16
17
| public class ExceptionDemo {
public static void main(String[] args) {
int[] arr = {2, 5, 8};
try {
int value = getValue(arr, 5);
System.out.println(value);
}catch (Exception e){
e.printStackTrace();
System.out.println("已经捕获到异常");
}
}
public static int getValue(int[] arr, int index){
return arr[index];
}
}
|
自定义异常
指的就是自定义了一个继承了Java已经写好的异常体系中的任意的类。
运行时异常(非受检异常)
只有运行时才会告诉调用者程序出现了错误。
代码案例
1
2
3
4
5
6
7
8
9
10
11
12
13
14
15
16
17
18
19
20
21
22
23
24
25
26
27
28
29
30
|
public class Exception1 extends RuntimeException{
public Exception1() {
}
public Exception1(String message) {
super(message);
}
}
public class MyTest1 {
public static void main(String[] args) {
int[] arr = {2, 5, 8};
System.out.println(getIndex(null, 10));
}
public static int getIndex(int[] arr, int key){
if (arr == null){
throw new Exception1("亲,数组不能为null啊。。。");
}
for (int i = 0; i < arr.length; i++) {
if (arr[i] == key){
return i;
}
}
return -1;
}
}
|
编译时异常(受检异常)
若调用者调用了某个方法,会自动检查调用者的传递参数等其他条件,不满足则在编译时就报错。
代码案例
1
2
3
4
5
6
7
8
9
10
11
12
13
14
15
16
17
18
19
20
21
22
23
24
25
26
27
28
29
30
31
32
33
34
35
|
public class Exception2 extends Exception{
public Exception2() {
}
public Exception2(String message) {
super(message);
}
}
public class MyTest2 {
public static void main(String[] args) {
int[] arr = {2, 5, 8};
try {
System.out.println(getIndex(null, 10));
}catch (Exception2 e){
e.printStackTrace();
}
System.out.println("如果上面捕获到异常,那么虚拟机就认为main没有发生异常,我就可以执行。");
}
public static int getIndex(int[] arr, int key) throws Exception2 {
if (arr == null){
throw new Exception2("亲,数组不能为null啊。。。");
}
for (int i = 0; i < arr.length; i++) {
if (arr[i] == key){
return i;
}
}
return -1;
}
}
|
Stream流
流是什么?
是java提供的一套专门操作数组或单列集合的API,允许我们使用lambda对数据按照指定的流程处理,将处理的结果收集起来;
获取流的四种情况(三种方式)
- 零散数据
可以利用Stream接口中的静态方法 Stream.of(T...);
- 数组数据
可以利用Arrays的静态方法 stream(数组);
- 单列集合
可以利用Collection接口的默认方法 stream();
- 双列集合
需要先转成单列集合,在利用单列集合的方式获取流对象;
1
2
3
4
5
6
7
8
9
10
11
12
13
14
15
16
17
18
19
20
21
22
23
24
|
public class getStream {
public static void main(String[] args) {
Stream<Integer> stream = Stream.of(2, 5, 8, 3, 6, 9);
stream.forEach(System.out::println);
int[] arr = {1, 4, 7};
IntStream stream1 = Arrays.stream(arr);
stream1.forEach(System.out::println);
ArrayList<Integer> list = new ArrayList<>();
Collections.addAll(list, 5, 6, 7, 8, 9);
Stream<Integer> stream2 = list.stream();
stream2.forEach(System.out::println);
Stream<int[]> arr1 = Stream.of(arr);
arr1.forEach(System.out::println);
}
}
|
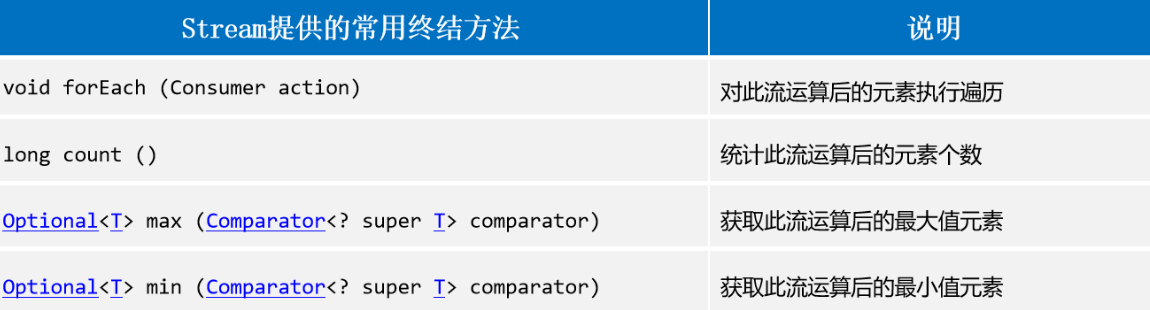
流的终结方法
任何的流调用完终结方法之后,就不会存在了,也就是流就结束了。
常用的终结方法有:
1
2
3
4
5
6
7
8
9
10
11
12
13
14
15
16
17
18
19
|
public class TerminateStream {
public static void main(String[] args) {
Stream<Integer> stream = Stream.of(2, 5, 8, 3, 6, 9);
System.out.println(stream.count());
Map<String, Integer> map = new HashMap<>();
map.put("A", 5);
map.put("B", 15);
map.put("C", 15);
map.put("D", 2);
System.out.println(map.values().stream().max((a, b) -> a - b).get());
}
}
|
流的中间方法
顾名思义:就是主要对流做一些数据处理的方法,处理完成后流还会存在。
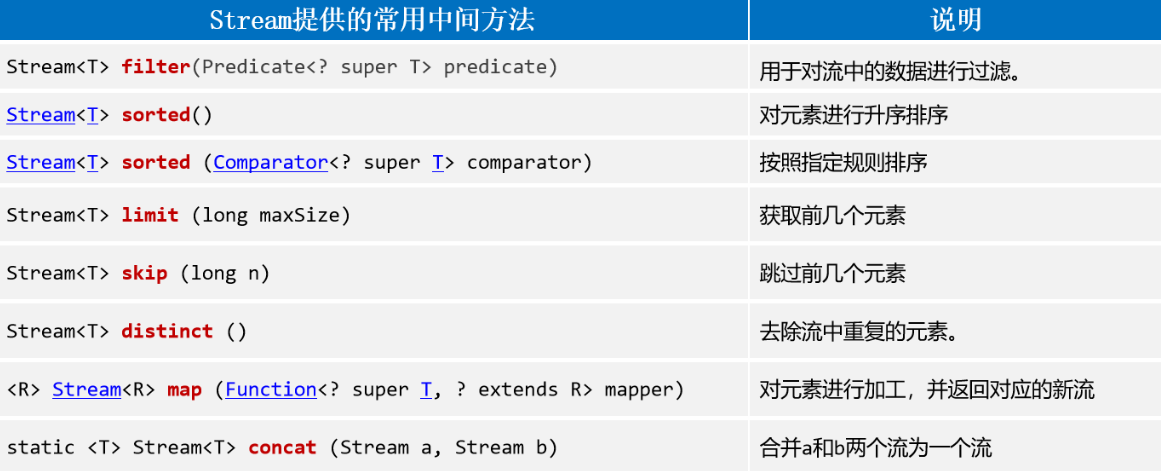
用的最多的中间方法:
1
2
3
4
5
6
7
8
9
10
11
12
13
14
15
16
17
18
19
20
21
22
23
24
25
26
27
28
29
30
31
|
public class MiddleMethodOfStream {
public static void main(String[] args) {
ArrayList<String> list = new ArrayList<>();
Collections.addAll(list, "张翠山","张无忌","张翠花","张翠翠","战三","华安","张三丰","张伟");
list.stream()
.filter(a -> a.startsWith("张"))
.filter(s ->s.length()==3)
.forEach(System.out::println);
int[] arr = {2, 5, 8, 3, 6, 9};
Arrays.stream(arr)
.filter(s -> s>=3).sorted().limit(3)
.forEach(System.out::println);
String s = "123,66,22,88,25,99,1024,55,22,66,123";
Arrays.stream(s.split(","))
.distinct().map(Integer::parseInt).sorted((a,b)->b-a)
.forEach(System.out::println);
Stream.concat(Stream.of(3, 6, 9), Stream.of(2, 5)).forEach(System.out::println);
}
}
|
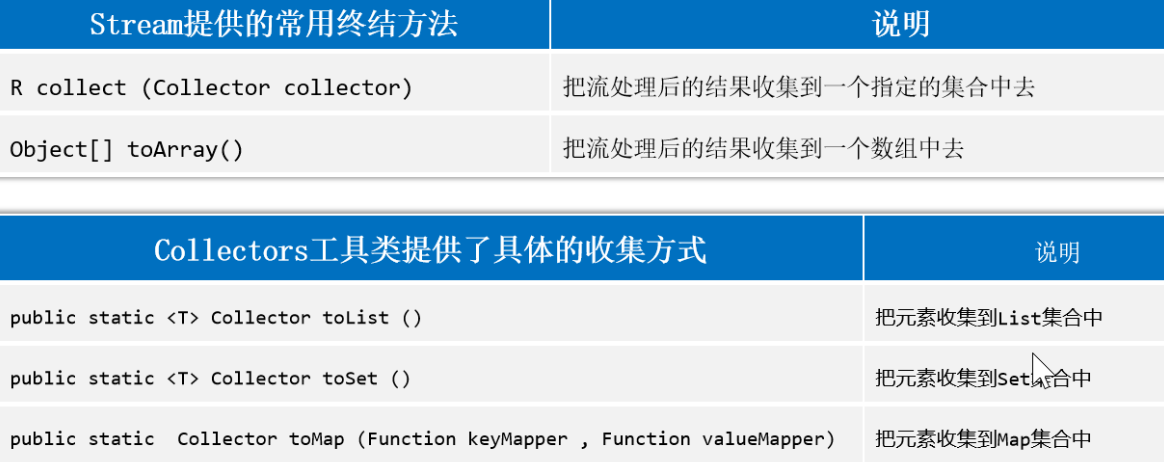
收集流对象
一般用的最多的就是Stream提供的常用的两个收集方法。
首先
将流中数据收集到数组中:流.toArray()将流中数据收集到List集合中:流.collect(Collectors.tolist())将流中数据收集到Set集合中:流.collect(Collectors.toSet())将流中数据收集到Map集合中:流.collect(Collectors.toMap(lambda1, lambda2))
1
2
3
4
5
6
7
8
9
10
11
12
13
14
15
16
17
18
19
20
21
22
23
24
25
|
public class collectStream {
public static void main(String[] args) {
ArrayList<String> list = new ArrayList<>();
Collections.addAll(list,"张翠山","张无忌","张翠花","张翠翠","战三","华安","张三丰","张伟");
Object[] array = list.stream().filter(s -> s.startsWith("张")).toArray();
System.out.println(Arrays.toString(array));
List<String> list1 = list.stream().filter(s -> s.startsWith("张")).collect(Collectors.toList());
System.out.println(list1);
Map<String, Character> collect = list.stream().collect(Collectors.toMap(s -> s, s -> s.charAt(0)));
System.out.println(collect);
String[] arr = {"张三,18","李四,20","王五,22"};
Map<String, String> collect1 = Arrays.stream(arr).collect(Collectors.toMap(s -> s.split(",")[0], s -> s.split(",")[1]));
System.out.println(collect1);
}
}
|
文件File
是Java专门用来操作文件或者文件夹的类,一般就是通过创建一个File类的对象来操作文件的本身。
Notice:可以操作文件的路径、大小信息、名称、创建、删除等,但是不能操作文件的内容。
三种获取File对象的方式
new File(文件完整路径)new File(父路径, 子路径)new File(父路径文件对象, 子路径)
1
2
3
4
5
6
7
8
9
10
11
12
13
14
15
16
17
18
19
20
21
22
|
public class getFileObj {
public static void main(String[] args) {
File f1 = new File("C:\\Users\\admin\\Desktop\\opt\\Java\\day08\\1.txt");
System.out.println(f1);
File f2 = new File("C:\\Users\\admin\\Desktop\\opt\\Java\\day08\\2.txt");
System.out.println(f2);
System.out.println(f1.exists());
System.out.println(f2.exists());
File f3 = new File("C:\\Users\\admin\\Desktop\\opt\\Java\\day08", "3.txt");
System.out.println(f3);
System.out.println(f3.exists());
File f4 = new File("day08\\1.txt");
System.out.println(f4.exists());
}
}
|
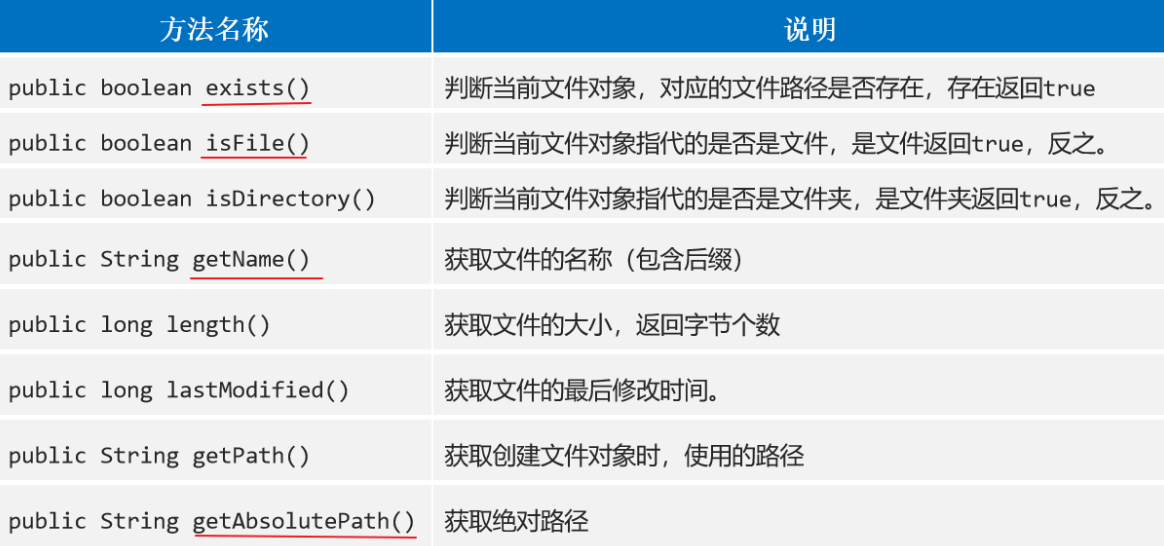
Flie类常用方法(一)
用的最多的方法:
- 判断文件是否存在
- 判断是否为一个文件
- 获取文件的名称
- 获取绝对路径
1
2
3
4
5
6
7
8
9
10
11
12
13
14
15
16
17
18
19
20
21
22
23
24
| public class MyFile {
public static void main(String[] args) {
File f1 = new File("day08\\1.txt");
System.out.println(f1.exists());
System.out.println(f1.isDirectory());
System.out.println(f1.isFile());
System.out.println(f1.getName());
File f2 = new File("C:\\Users\\admin\\Desktop\\opt\\Java\\day08");
System.out.println(f2.getName());
System.out.println(f2.isDirectory());
System.out.println(f1.length());
System.out.println(new Date(f1.lastModified()).toLocaleString());
System.out.println(f2.lastModified());
System.out.println(f1.getPath());
System.out.println(f2.getPath());
System.out.println(f1.getAbsolutePath());
System.out.println(f2.getAbsolutePath());
}
}
|
Flie类常用方法(二)
这里主要是关于文件/文件夹的创建和删除。
注意删除文件夹的时候,该文件夹必须为空才能够删除,否则就不能删除。(文件没有要求)
创建文件相关方法
- 创建一个新的空文件:createNewFile()
- 创建单级文件:mkdir()
- 创建多级文件夹:mkdirs()
删除文件相关方法
1
2
3
4
5
6
7
8
9
10
11
12
13
14
15
16
17
|
public class commonMethod2 {
public static void main(String[] args) {
File f = new File("C:\\Users\\admin\\Desktop\\opt\\Java\\day08\\a");
System.out.println(f.mkdir());
File f3 = new File("C:\\Users\\admin\\Desktop\\opt\\Java\\day08\\aa\\bb\\cc");
File f2 = new File("C:\\Users\\admin\\Desktop\\opt\\Java\\day08\\aa\\cc\\2.txt");
System.out.println(f2.delete());
System.out.println(f.delete());
System.out.println(f3.delete());
}
}
|
遍历文件夹
遍历单层文件夹:File对象.listFiles()
1
2
3
4
5
6
7
8
9
10
11
12
13
14
15
16
17
18
|
public class traverseDir {
public static void main(String[] args) {
File file = new File("C:\\Users\\admin\\Desktop\\opt\\Java\\day08\\aa");
File[] files = file.listFiles();
for (File f : files) {
System.out.println(f.getAbsolutePath());
f.delete();
}
file.delete();
}
}
|
listFiles方法相关注意事项
注意标红的就好了。

遍历多层文件及文件夹(※)
需要使用到递归(递归两个重点:1,找规律;2,找出口)
1
2
3
4
5
6
7
8
9
10
11
12
13
14
15
16
17
18
19
20
21
22
|
public class recursionDir {
public static void main(String[] args) {
File file = new File("C:\\Users\\admin\\Desktop\\opt\\Java\\day08\\src\\com\\xlkh");
getSubFiles(file);
}
public static void getSubFiles(File file){
File[] files = file.listFiles();
for (File f : files) {
if (f.isDirectory()){
System.out.println(f);
getSubFiles(f);
} else if (f.isFile()) {
System.out.println(f.getAbsolutePath());
}
}
}
}
|
附:递归(Recursion)
1
2
3
4
5
6
7
8
9
10
11
12
13
14
15
16
17
|
public class recursion {
public static void main(String[] args) {
System.out.println(getFactorial(5));
}
public static int getFactorial(int n){
if (n == 1){
return 1;
}else {
return n * getFactorial(n - 1);
}
}
}
|
IO流
框架体系
字符集
常见的编码字符集如下:
ASCII字符集(ASCII编码表) 仅包含数字,字母,特殊符号和数字的对应关系;
GBK 中国人规定的码表,规定了汉字与数字的对应关系,但是由于汉字较多,所以需要使用两个数字对应一个汉字,且第1个数字一定是负数;
Unicode 万国码表,收录了全球所有国家使用的符号,方便统一管理;
UTF-32 unicode下的具体一种编码格式,规定所有符号都使用4个字节表示,比较浪费空间;
UTF-8 UTF-32的优化,尽可能少的占用字节,当能用更少的字节表示数据的时候,就采用少字节存储;在该编码格式下,一个汉字会占用3个字节;
支持中文的码表:GBK和UTF-8
解码与编码
1
2
3
4
5
6
7
8
9
10
11
12
13
14
15
16
17
18
19
20
21
22
23
24
25
26
27
|
public class charSetDemo {
public static void main(String[] args) throws UnsupportedEncodingException {
String s = "你好";
byte[] arr = s.getBytes();
System.out.println(Arrays.toString(arr));
byte[] gbks = s.getBytes("gbk");
System.out.println(gbks);
String s1 = new String(arr);
String s2 = new String(gbks);
System.out.println(s1);
System.out.println(s2);
String s3 = new String(gbks, "GBK");
System.out.println(s3);
}
}
|
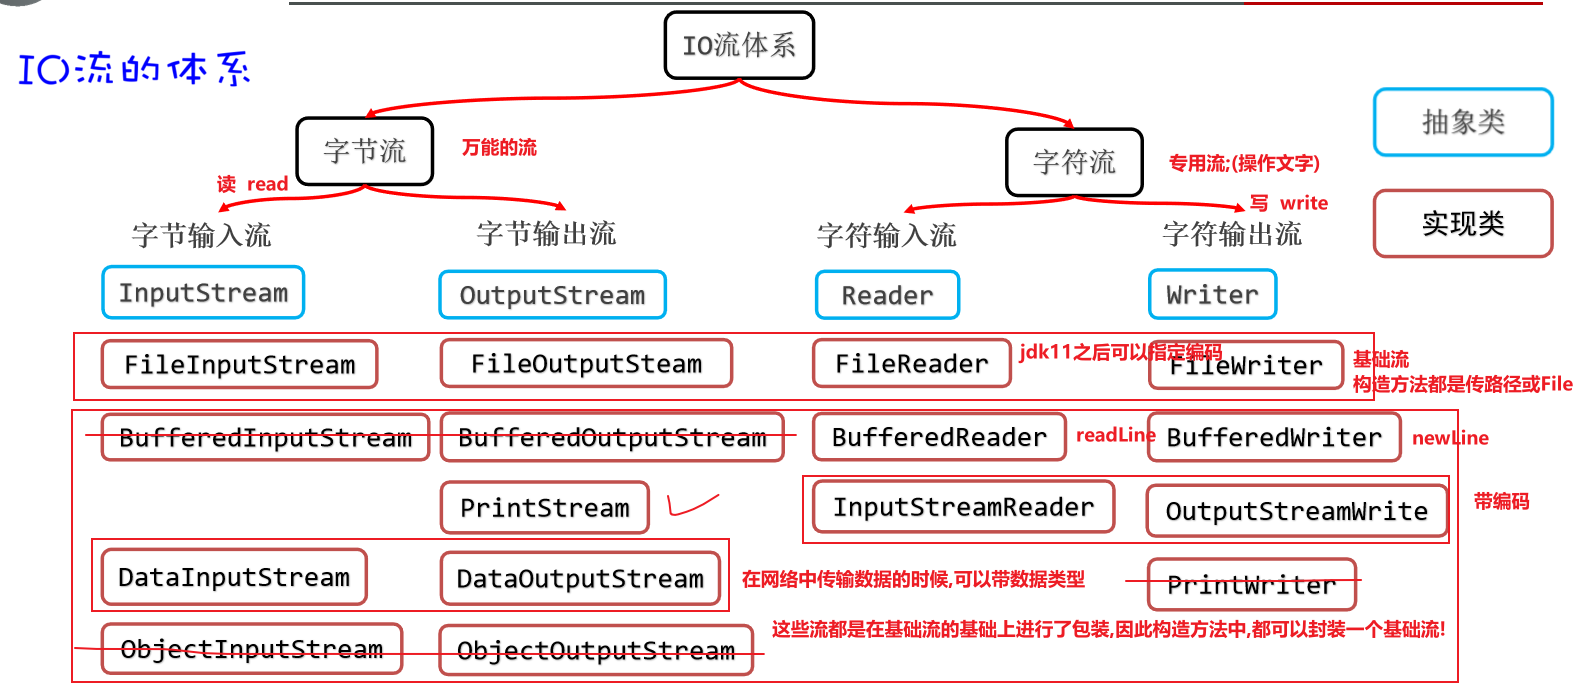
常见的IO流
IO流是什么?IO流就是专门负责操作文件或网络中数据的。
大致可以分为:
字节输入流 顶层代表 InputStream
- 以内存为基准,将来自磁盘/网络中的数据以
字节的形式读入到内存中
字节输出流 顶层代表 OutputStream
- 以内存为基准,把内存中的数据以
字节写出到磁盘/网络中
字符输入流 顶层代表 Reader
- 以内存为基准,将来自磁盘/网络中的数据以
字符的形式读入到内存中
字符输出流 顶层代表 Writer
- 以内存为基准,把内存中的数据以
字符写出到磁盘/网络中
因为以字节的形式需要考虑到很多关于编码和解码的问题,且转为字节不是非常方便。
文件字节输入流
创建文件字节输入流的方式主要有两种
- 首先创建文件,将文件对象传递进FileInputStream()类中,产生该类的对象。
- 第二种方式是直接通过FileInputStream将文件路径传递进去,生成字节输入流对象。
1
2
3
4
5
6
7
8
9
10
11
12
13
14
15
16
17
18
19
20
21
22
23
|
public class readFileThroughBytes {
public static void main(String[] args) throws IOException {
FileInputStream fin = new FileInputStream("C:\\Users\\admin\\Desktop\\opt\\Java\\day09\\src\\com\\xlkh\\demo01_charSet\\a.txt");
int res;
while ((res = fin.read()) != -1){
System.out.println((char) res);
}
}
}
|
使用数组以字节方式读取文件中的数据。
1
2
3
4
5
6
7
8
9
10
11
12
13
14
15
16
17
18
19
20
21
22
|
public class arrayEnhance_ByteInputStream {
public static void main(String[] args) throws IOException {
File f = new File("C:\\Users\\admin\\Desktop\\opt\\Java\\day09\\src\\com\\xlkh\\demo01_charSet\\a.txt");
FileInputStream fin = new FileInputStream(f);
byte[] arr = new byte[(int) f.length()];
fin.read(arr);
System.out.println(new String(arr));
byte[] by = fin.readAllBytes();
System.out.println(Arrays.toString(by));
}
}
|
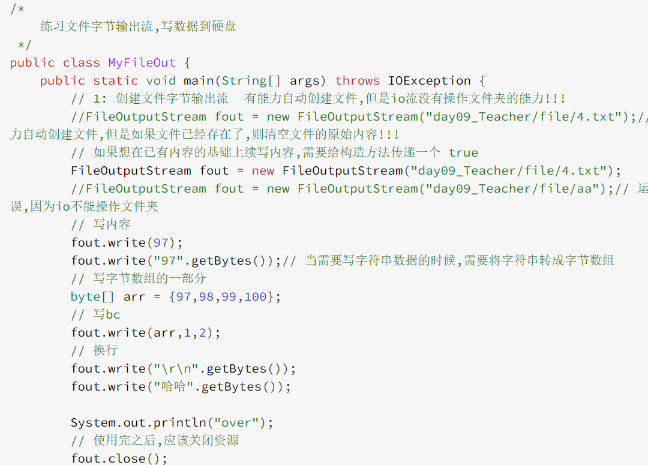
文件字节输出流(FileOutputStream)
将字节输出到文件中,主要分为三步,首先将打开冰箱门,第二步放入大象….不好意思,串台了。
文件资源释放
两种方式进行文件资源释放:
try catch finally和try with resource
1
2
3
4
5
6
7
8
9
10
11
12
13
14
15
16
17
18
19
20
21
22
23
24
25
| public class tryCatchFinally {
public static void main(String[] args) {
FileOutputStream fout = null;
try {
fout = new FileOutputStream("C:\\Users\\admin\\Desktop\\opt\\Java\\day09\\src\\com\\xlkh\\demo03_tryWithResource\\b.txt");
fout.write(97);
fout.write("97".getBytes());
} catch (IOException e) {
e.printStackTrace();
System.out.println("捕获到异常..");
} finally {
try {
if (fout != null){
fout.close();
}
} catch (IOException e) {
e.printStackTrace();
}
}
}
}
|
1
2
3
4
5
6
7
8
9
10
11
12
13
14
15
16
|
public class tryWithResource {
public static void main(String[] args) {
try(FileOutputStream fout = new FileOutputStream("C:\\Users\\admin\\Desktop\\opt\\Java\\day09\\src\\com\\xlkh\\demo03_tryWithResource\\b.txt")){
fout.write(97);
fout.write("97".getBytes());
} catch (IOException e) {
e.printStackTrace();
System.out.println("catch...over!");
}
}
}
|
字节流的应用
注意事项※
使用字节输入流读取数据的时候:字节输入流.read()
- 如果知识单纯的f.read(),则f.read()的返回值是读取到字节的码值
- 如果是f.read(数组),则返回的是读取到的字节的个数
递归获取文件夹大小
1
2
3
4
5
6
7
8
9
10
11
12
13
14
15
16
17
18
19
20
21
22
23
|
public class recursionGetDirSize {
public static void main(String[] args) {
File dir = new File("C:\\Users\\admin\\Desktop\\Diary");
System.out.println(getTotalLength(dir));
}
public static long getTotalLength(File dir){
long totalLength = 0;
File[] files = dir.listFiles();
for (File file : files) {
if (file.isFile()){
totalLength += file.length();
}else {
long dirlen = getTotalLength(file);
totalLength += dirlen;
}
}
return totalLength;
}
}
|
递归复制文件夹及其子目录
1
2
3
4
5
6
7
8
9
10
11
12
13
14
15
16
17
18
19
20
21
22
23
24
25
26
27
28
29
30
31
32
33
34
35
36
37
38
39
|
public class recursionCopyDir {
public static void main(String[] args) throws IOException {
File srcFile = new File("E:\\opt\\Java\\就业班\\Java进阶课程\\day09-字符集、IO流(一)\\a");
File dstFile = new File("E:\\opt\\Java\\就业班\\Java进阶课程\\day09-字符集、IO流(一)\\b");
copyDir(srcFile, dstFile);
}
public static void copyDir(File src, File dst) throws IOException {
File[] files = src.listFiles();
for (File file : files) {
File dstFile = new File(dst, file.getName());
if (file.isFile()){
copyFile(file, dstFile);
}else {
dstFile.mkdirs();
copyDir(file, dstFile);
}
}
}
public static void copyFile(File srcFile, File dstFile) throws IOException {
FileInputStream fin = new FileInputStream(srcFile);
FileOutputStream fout = new FileOutputStream(dstFile);
byte[] arr = new byte[1024 * 8];
int count;
while ((count = fin.read(arr)) != -1){
fout.write(arr, 0, count);
}
}
}
|
字符流
字符输入流
常用的方法:
- FileReader对象.read()
- FileReader对象.read(字符型数组)
- 每次用字符数组读取数据,返回字符数组读取了多少字符,如果没有读到数据也会返回-1
因为使用单个字符读取数据的方式会比较低效,使用的场景非常有限,一般都是使用数组进行数据读取。
1
2
3
4
5
6
7
8
9
10
11
12
13
14
15
16
|
public class charArrReader {
public static void main(String[] args) throws IOException {
FileReader fr = new FileReader("C:\\Users\\admin\\Desktop\\opt\\Java\\day09\\src\\com\\xlkh\\demo01_charSet\\a.txt");
int count;
char[] arr = new char[8192];
while ((count = fr.read(arr)) != -1){
System.out.println(new String(arr, 0, count));
}
fr.close();
}
}
|
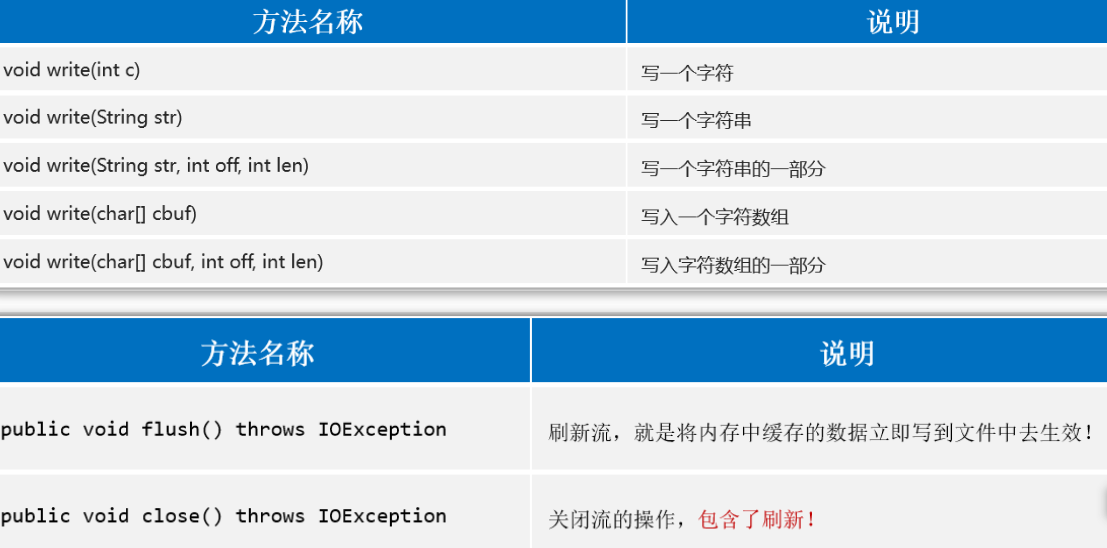
字符输出流
常用的方法:
构造方法:
- new FileWriter(File f):使用文件对象创建字符输出流对象,
覆盖写入
- new FileWriter(String filePath):使用文件路径创建字符输出流对象, 同上
- new FileWriter(File f, boolean true):使用文件对象创建字符输出流对象,
追加写入
- new FileWriter(String filePath, boolean true):使用文件路径创建字符输出流对象,同上
成员方法:
字节缓冲流(了解)
字符缓冲流(※)
概述
- 专门针对字符流进行包装的流,不仅仅提升了循环读取单个字符的性能,还提供了特有方法(读一行和跨平台的换行);
作用
- 提升字符操作性能;
- 提供特有方法,更方便读写文本数据;
使用套路
- 都是利用带一个基本流的构造方法创建对象;
- 直接调用特有方法即可;
具体API
- BufferWriter(Writer r): 把低级的字符输出流包装成一个高级的缓冲字符输出管道,提高字符输出流写数据的性能
- 特殊方法:public void newLine()
- 好处:可以模拟不同平台的换行,从而实现写数据自带换行
- Linux,Windows,MacOS换行都有一定区别。
1
2
3
4
5
6
7
8
9
10
11
12
13
14
15
16
17
18
19
20
| public class charBufferOutputStream {
public static void main(String[] args) throws Exception {
FileWriter fw = new FileWriter("C:\\Users\\admin\\Desktop\\opt\\Java\\day10\\src\\com\\xlkh\\test.txt");
BufferedWriter bw = new BufferedWriter(fw);
for (int i = 0; i < 10; i++) {
bw.write("测试数据"+ i);
bw.newLine();
bw.flush();
}
bw.close();
System.out.println("over!");
}
}
|
- BufferReader(Reader r): 把低级的字符输入流包装成字符缓冲输入流管道,提高字符输入流的性能
- 特殊方法:public void readLine()
1
2
3
4
5
6
7
8
9
10
11
12
13
14
15
16
| public class charBufferInputStream {
public static void main(String[] args) throws Exception {
FileReader fr = new FileReader("C:\\Users\\admin\\Desktop\\opt\\Java\\day10\\src\\com\\xlkh\\test.txt");
BufferedReader br = new BufferedReader(fr);
String s;
while ((s=br.readLine()) != null){
System.out.println(s);
}
br.close();
}
}
|
缓冲流综合练习-对文件内容排序
- 文件 综合案例
- 需求说明:
- 分析:
- 文件本身不能直接对内容排序,因此需要将文件的内容,读取到内存中,在内存中完成排序后,再重新写回文件即可
1,读取文件的时候,应该逐行读取数据
2,遇到空白行应该排除
3,读取的内容,应该存入到一个TreeSet集合,自定义排序规则
4,遍历set集合,把内容逐行写回文件即可
1
2
3
4
5
6
7
8
9
10
11
12
13
14
15
16
17
18
19
20
21
22
23
24
25
26
27
28
29
30
31
| public class charStreamDemo {
public static void main(String[] args) throws Exception {
FileReader fr = new FileReader("C:\\Users\\admin\\Desktop\\opt\\Java\\day10\\src\\com\\xlkh\\3_bak.txt");
BufferedReader br = new BufferedReader(fr);
TreeSet<String> ts = new TreeSet<>((a,b) -> Integer.parseInt(String.valueOf(a.charAt(0))) - Integer.parseInt(String.valueOf(b.charAt(0))));
String s;
while ((s = br.readLine())!= null){
if (!s.isEmpty()){
ts.add(s);
}
}
for (String t : ts) {
System.out.println(t);
}
FileWriter fw = new FileWriter("C:\\Users\\admin\\Desktop\\opt\\Java\\day10\\src\\com\\xlkh\\test.txt", true);
BufferedWriter bw = new BufferedWriter(fw);
for (String t : ts) {
bw.append(t);
bw.newLine();
bw.flush();
}
bw.close();
}
}
|
转换流
概述
为什么要转
- 因为在将字节流转成字符流的时候,可以指定编码格式;
如何转
- 字节输入流,转成字符输入流: InputStreamReader,构造方法中传递一个基本的字节输入流,再加一个编码表字符串即可;
- 字节输出流,转成字符输出流: OutputStreamWriter,构造方法中传递一个基本的字节输出流,再加一个编码表字符串即可;
参考代码–读
1
2
3
4
5
6
7
8
9
10
11
12
13
14
15
16
17
18
19
20
21
22
23
24
25
|
public class converStreamRead {
public static void main(String[] args) throws Exception {
FileInputStream fin = new FileInputStream("C:\\Users\\admin\\Desktop\\opt\\Java\\day10\\src\\com\\xlkh\\test.txt");
InputStreamReader isr = new InputStreamReader(fin);
InputStreamReader isr1 = new InputStreamReader(fin, "gbk");
FileReader isr2 = new FileReader("C:\\Users\\admin\\Desktop\\opt\\Java\\day10\\src\\com\\xlkh\\test.txt", Charset.forName("gbk"));
int c;
while ((c = isr.read()) != -1){
System.out.println((char) c);
}
isr2.close();
}
}
|
参考代码–写
1
2
3
4
5
6
7
8
9
10
11
12
13
14
15
16
17
|
public class MyOutputStreamWriter {
public static void main(String[] args) throws Exception {
FileOutputStream fout = new FileOutputStream("day10_Teacher/file/5.txt");
FileWriter osw = new FileWriter("day10_Teacher/file/7.txt",Charset.forName("GBK"));
osw.write("6哈6");
osw.close();
}
}
|
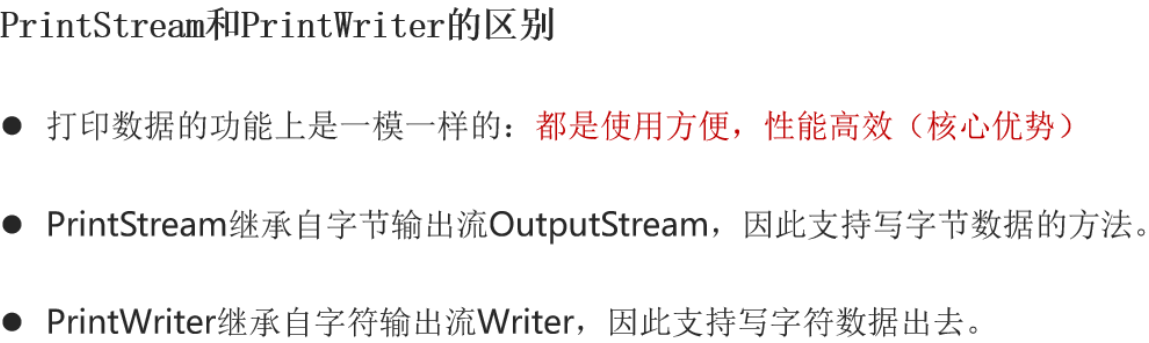
打印流(PrintStream)
概述
- 打印流就是专门负责将内存中的数据,写到指定的目的地的流;
作用
- 简化输出数据的代码;(想输出任意类型的内容,可以利用print方法直接输出即可,想换行,直接利用println方法即可);
使用步骤
- 创建打印流对象;
- 直接调用方法打印数据即可;
- 释放资源;
参考代码
1
2
3
4
5
6
7
8
9
10
11
12
13
14
15
16
17
18
19
|
public class printStreamTest {
public static void main(String[] args) throws Exception {
PrintStream ps = new PrintStream("C:\\Users\\admin\\Desktop\\opt\\Java\\day10\\src\\com\\xlkh\\a.txt", "GBK");
ps.println(97);
ps.println("Java");
ps.print("Python");
ps.println(18);
ps.flush();
ps.close();
}
}
|
数据流
概述
- 可以把数据值传递的同时也可以携带该数据的数据类型;
如何创建对象
- DataOutputStream:专门负责输出数据;
- DataInputStream:专门负责读 DataOutputStream 曾经写的数据;
- 构造方法中都是封装了一个基本的字节流;
常用方法-写
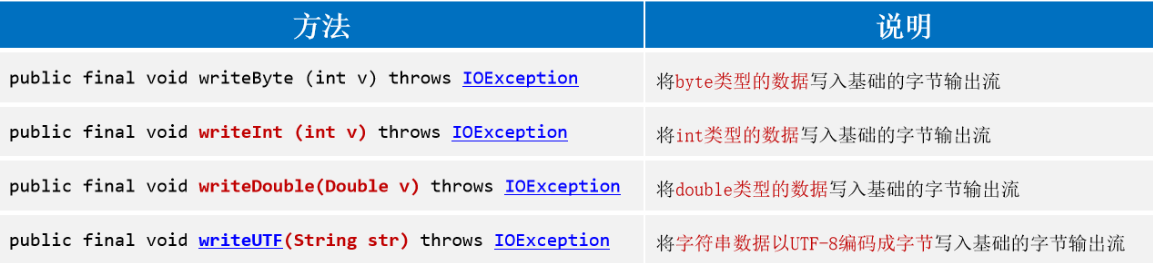
1
2
3
4
5
6
7
8
9
10
11
12
13
14
15
16
17
18
19
20
|
public class myWriteDataStream {
public static void main(String[] args) throws Exception {
FileOutputStream fout = new FileOutputStream("C:\\Users\\admin\\Desktop\\opt\\Java\\day10\\src\\com\\xlkh\\b.txt");
DataOutputStream dop = new DataOutputStream(fout);
dop.writeByte(97);
dop.writeInt(88);
dop.writeBoolean(true);
dop.writeUTF("藕嫩叠");
dop.close();
}
}
|
常用方法-读
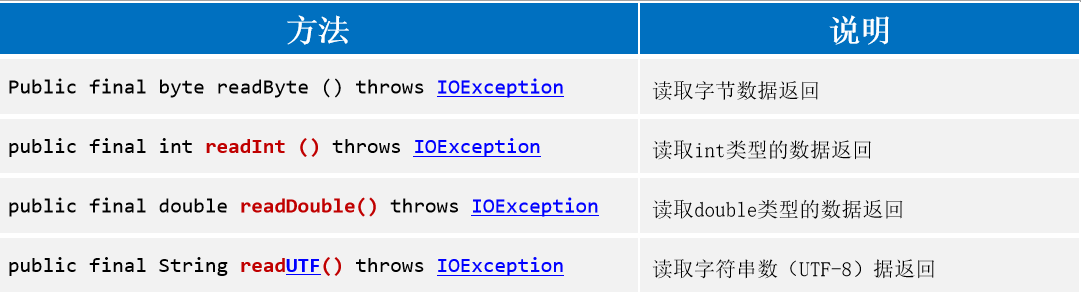
1
2
3
4
5
6
7
8
9
10
11
12
13
14
15
16
17
| public class myReadDataStream {
public static void main(String[] args) throws Exception {
FileInputStream fis = new FileInputStream("C:\\Users\\admin\\Desktop\\opt\\Java\\day10\\src\\com\\xlkh\\b.txt");
DataInputStream dis = new DataInputStream(fis);
byte b = dis.readByte();
int i = dis.readInt();
boolean b1 = dis.readBoolean();
String s = dis.readUTF();
System.out.println(b);
System.out.println(i);
System.out.println(b1);
System.out.println(s);
}
}
|
对象流(序列化流)
概述
- 可以将java内存中的对象整体写到硬盘,也可以把硬盘上的对象,再读到内存中;
类型
- 写数据用: ObjectOutputStream ,(写数据的过程称为 序列化)
- 读数据用: ObjectInputStream , (读数据的过程称为 反序列化)
构造方法
常用方法-写

参考代码
1
2
3
4
5
6
7
8
9
10
11
12
13
14
15
16
|
public class serializableOutputStream {
public static void main(String[] args) throws Exception {
FileOutputStream fos = new FileOutputStream("C:\\Users\\admin\\Desktop\\opt\\Java\\day10\\src\\com\\xlkh\\obj.txt");
ObjectOutputStream oos = new ObjectOutputStream(fos);
Student s1 = new Student("张三", 18);
oos.writeObject(s1);
oos.close();
}
}
|
1
2
3
4
5
6
7
8
9
10
11
12
13
14
15
| public class serializableInputStream {
public static void main(String[] args) throws Exception {
FileInputStream fis = new FileInputStream("C:\\Users\\admin\\Desktop\\opt\\Java\\day10\\src\\com\\xlkh\\obj.txt");
ObjectInputStream ois = new ObjectInputStream(fis);
Object o = ois.readObject();
Student s = (Student) o;
System.out.println(s.getName() + "-------" + s.getAge());
ois.close();
}
}
|
注意事项
对象必须实现 Serializable 接口,否则无法序列化和反序列化!!!

特殊文件的读取
properties
Properties 是代表属性的意思,在Java中常常用这种后缀类型的文件作为配置文件。
配置文件出来了,那必然是需要我们去读取的,如果用字符流读取可以但是没必要,用读取properties常用的方法往往无往而不利。
概述
类似于:
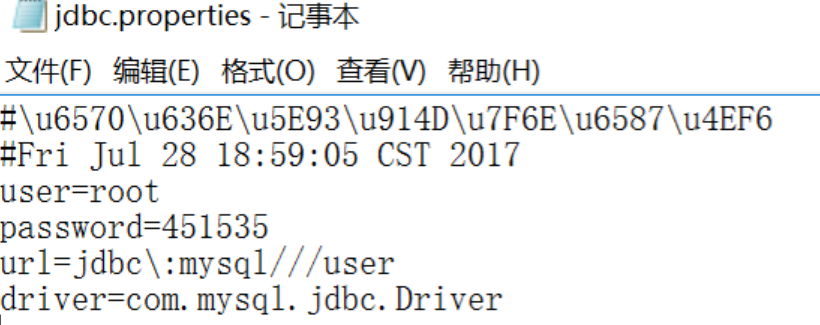

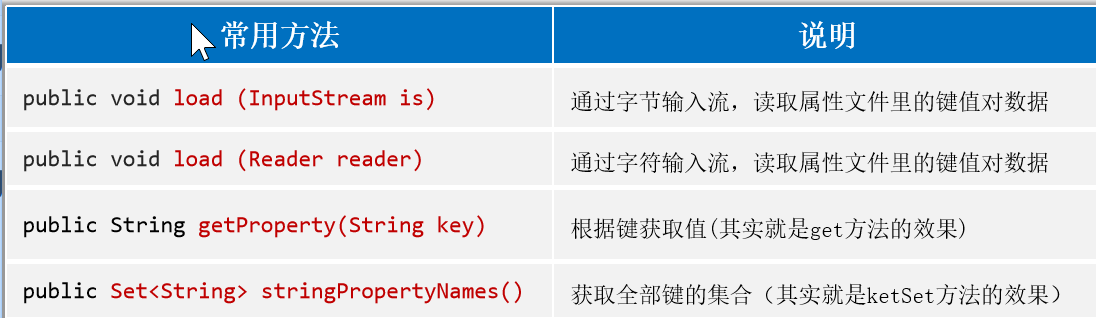

参考代码
1
2
3
4
5
6
7
8
9
10
11
12
13
14
15
16
17
18
19
20
21
22
23
24
25
26
27
28
|
public class myProperties {
public static void main(String[] args) throws Exception {
Properties p = new Properties();
p.setProperty("aa", "11");
p.setProperty("bb", "22");
p.setProperty("cc", "33");
System.out.println(p);
FileInputStream fr = new FileInputStream("C:\\Users\\admin\\Desktop\\opt\\Java\\day11\\files\\2.properties");
p.load(fr);
System.out.println(p);
System.out.println(p.getProperty("name"));
Set<String> set = p.stringPropertyNames();
for (String s : set) {
System.out.println(s + "---->" + p.getProperty(s));
}
}
}
|
xml
概述
是一门可扩展的标记语言;
作用
- 通过自定义的标记,存储或表示数据用的;通过开发中会使用xml文件当成系统的配置文件(存储着如何让程序运行的信息)使用;
语法
注释
1
2
| <!-- 注释 -->
如果有大量的转义字符,可以使用 CDATA区存;
|
1
2
3
4
5
6
7
8
9
10
11
12
13
14
15
16
17
18
19
20
21
22
23
24
25
26
27
28
| <?xml version="1.0" encoding="utf-8" ?>
<!-- 这是注释 -->
<abcd>
<aaa>
<b>
</b>
<b name ="嘿嘿">
<为所欲为 >
</b>
<![CDATA[
<水浒传>
<红楼梦>
<<<
>>>
'
""
]]>
<bbb id="345" />
</aaa>
<b>
</b>
</abcd>
|
xml解析
利用dom4j工具完成;
使用步骤
1
2
3
4
5
6
7
8
9
10
11
12
13
14
15
16
17
18
19
20
21
22
23
24
25
26
27
28
29
30
31
32
33
34
35
36
37
38
39
40
41
42
43
| <?xml version="1.0" encoding="utf-8" ?>
<!-- 这是注释 -->
<stus>
<student id="1">
<name>张三</name>
<age>18</age>
</student>
<student id="2">
<name>李四</name>
<age>19</age>
</student>
</stus>
public class xmlParse {
public static void main(String[] args) throws Exception {
SAXReader reader = new SAXReader();
Document d = reader.read("C:\\Users\\admin\\Desktop\\opt\\Java\\day11\\files\\stu.xml");
Element root = d.getRootElement();
List<Element> stus = root.elements();
for (Element stu : stus) {
String id = stu.attribute("id").getValue();
System.out.println("id" + id);
List<Element> prop = stu.elements();
for (Element name_age : prop) {
String text = name_age.getText();
String name = name_age.getName();
System.out.println(name + "标签下的内容是" + text);
}
}
}
}
|
约束
概述
定义:可以对xml文件的内容进行限制的技术;
作用
- dtd文件,可以对xml文件的内容进行粗粒度的限制;
- xsd文件可以对xml文件的内容进行细粒度的限制;
分类
dtd约束,老的约束,粒度粗;
schema约束,新的约束技术,粒度细致;
语法

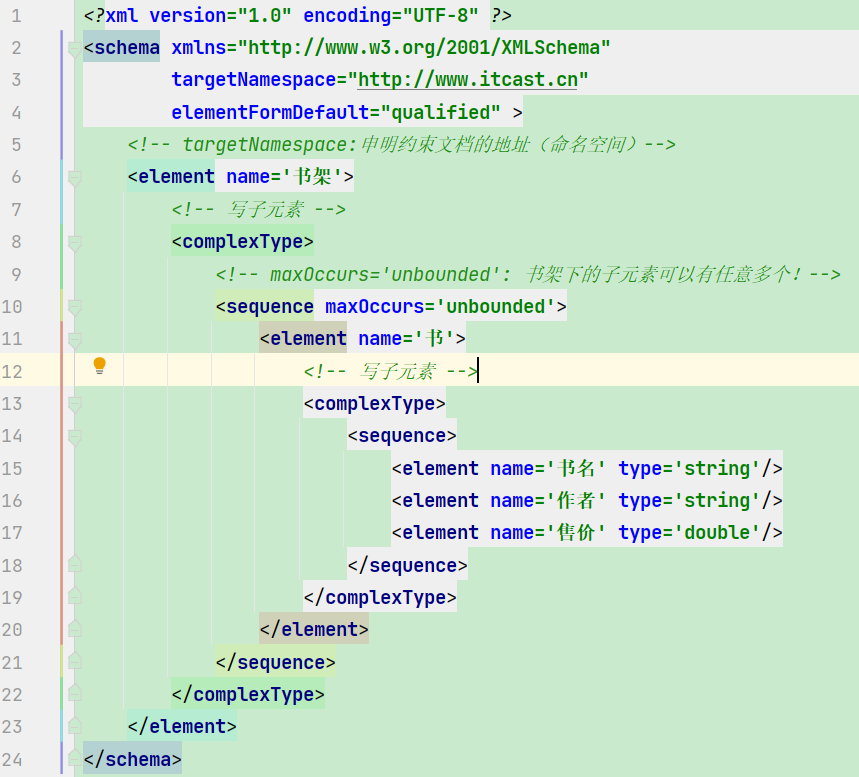
xml和约束文件的引入方式
dtd引入:
1
| <!DOCTYPE 书架 SYSTEM "data.dtd">
|
xsd引入:
1
2
3
| <书架 xmlns="http://www.itcast.cn"
xmlns:xsi="http://www.w3.org/2001/XMLSchema-instance"
xsi:schemaLocation="http://www.itcast.cn data.xsd">
|
xml的内容,按照约束的提示写即可;
日志及多线程三种实现方式
日志
概述:专门用于记录程序运行的状态的技术;
常见日志框架
logback的使用步骤
环境级别:
- 下载并复制jar包到idea;
- 复制配置文件到源码目录;
代码级别:
- 修改配置文件的内容;
- 获取一个日志对象;
- 面向对象,调用方法;
注意事项
- 配置文件的名称和路径必须按框架的要求写和存;(必须放在源码目录下且名称是 logback.xml)
- 获取日志对象的时候,注意包;
参考代码
1
2
3
4
5
6
7
8
9
10
11
12
13
14
15
16
17
18
|
public class TestLogBack {
public static final Logger LOG= LoggerFactory.getLogger("TestLogBack");
public static void main(String[] args) {
System.out.println("正常代码1");
LOG.info("第一行代码走完了,没有出问题...");
System.out.println("正常代码2");
LOG.debug("第2行走完了,,,,debug级别");
System.out.println("正常代码3");
LOG.error("严重问题,代码走完了");
}
}
|
日志级别
作用
- 程序员可以通过设置不同的级别,从而决定记录程序中的不同问题;
具体级别
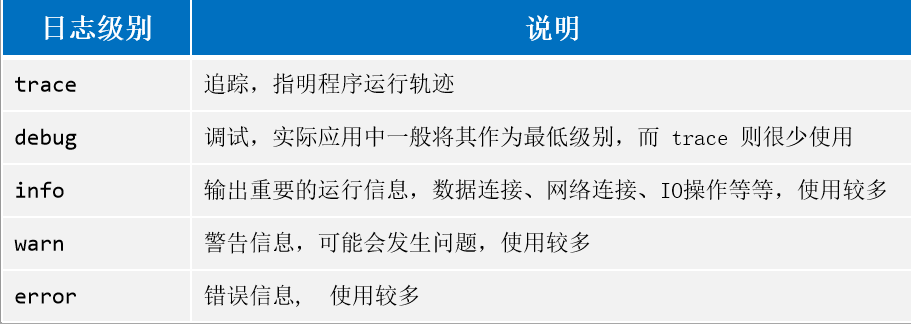
程序中会记录指定的级别以及更高的级别的问题!!!
多线程
概述
- 所谓的线程就是代码执行的通道;一个代码执行通道就是单线程程序,多个代码执行通道就是多线程程序;
应用场景
实现方式
方式1-继承Thread
参考代码
1
2
3
4
5
6
7
8
9
10
11
12
13
14
15
16
17
18
19
20
21
22
23
24
25
26
27
28
|
public class MyThread extends Thread {
public void run() {
for (int i = 0; i < 100; i++) {
System.out.println("我们自定义的线程打印了数据:"+i);
}
}
}
package com.itheima.demo05_Thread_1;
public class Test {
public static void main(String[] args) {
MyThread m1 = new MyThread();
m1.start();
for (int i = 0; i < 100; i++) {
System.out.println("mian:"+i);
}
}
}
|
方式2-实现Runnable接口
- 概述
- 我们自定义的类,实现接口,仅仅算术一个任务类,将来可以将该类的对象,作为线程的参数传递进去,让线程执行这个任务即可;
代码实现
1
2
3
4
5
6
7
8
9
10
11
12
13
14
15
16
17
18
19
20
21
22
23
24
25
26
|
public class MyRun implements Runnable{
@Override
public void run() {
for (int i = 0; i < 100; i++) {
System.out.println("第二种方式创建的单纯的任务:"+i);
}
}
}
public class MyTest02 {
public static void main(String[] args) {
MyRun rw = new MyRun();
Thread t = new Thread(rw);
t.start();
for (int i = 0; i < 100; i++) {
System.out.println("main:"+i);
}
}
}
|
方式3-实现Callable接口
概述
- 程序员可以写一个带返回值的任务类,只需要实现 Callable接口即可,但是这个接口无法直接和线程绑定,需要借助 FutureTask 类中转才可以,将来也可以面向 FutureTask 类的对象,获取线程的结果;
FutureTask的常用方法

参考代码
1
2
3
4
5
6
7
8
9
10
11
12
13
14
15
16
17
18
19
20
21
22
23
24
25
26
27
28
|
public class MyCall implements Callable<Integer> {
@Override
public Integer call() throws Exception {
System.out.println("模拟计算中....");
Thread.sleep(3000);
System.out.println("模拟计算完....");
return 666;
}
}
public class Test {
public static void main(String[] args) throws ExecutionException, InterruptedException {
MyCall my = new MyCall();
FutureTask<Integer> task = new FutureTask<>(my);
new Thread(task).start();
System.out.println("模拟main已经开启线程完毕...");
Integer integer = task.get();
System.out.println("mian得到的结果是:"+integer);
}
}
|


 微信
微信 支付宝
支付宝